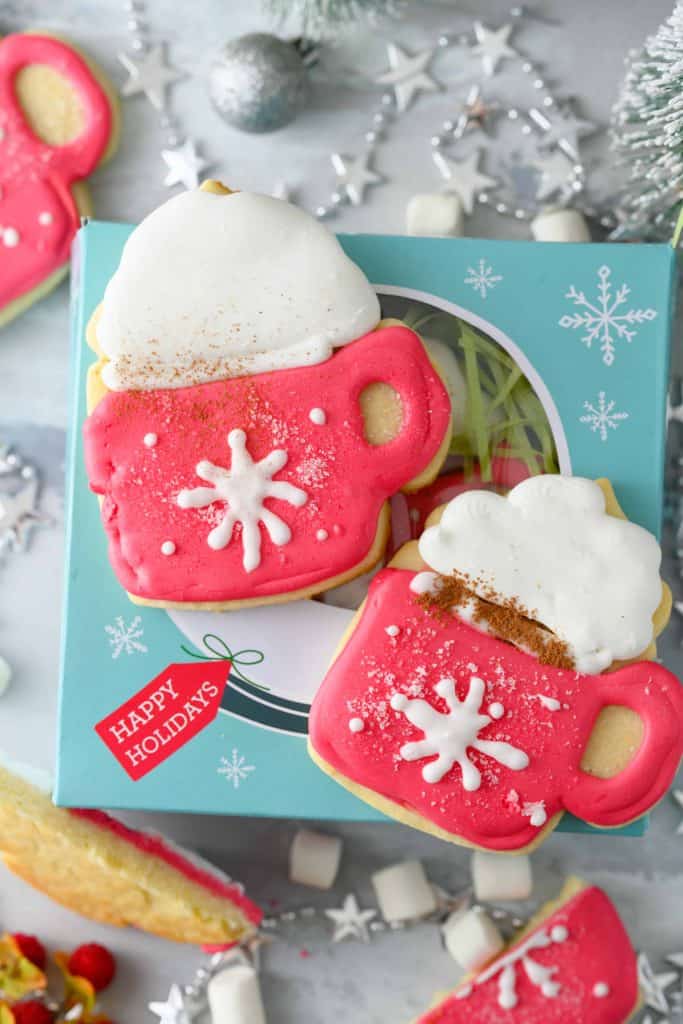
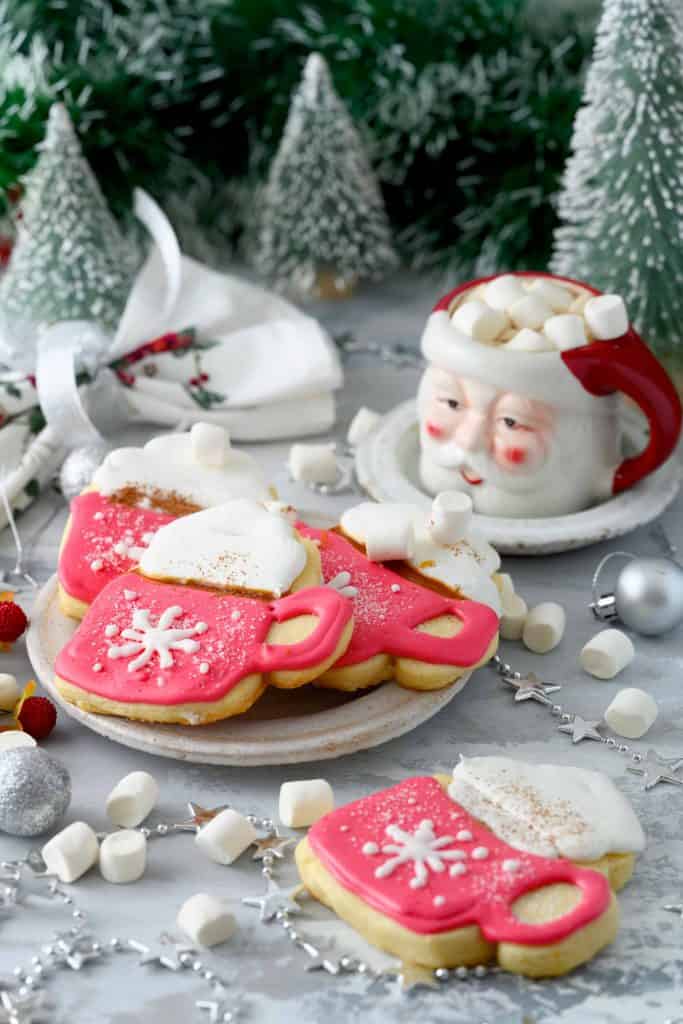
Hot Cocoa Mug Sugar Cookies

Baking sugar cookies for the holidays is a tradition for so many families. It is fun to spend time together decorating them with colorful icing and beautiful sprinkles. With these Hot Cocoa Mug Sugar Cookies, you can keep the tradition alive all winter long by making these delicious treats!

*This post contains affiliate links. As an Amazon Affiliate, I earn a commission on qualifying purchases.
What do I need to make the Hot Cocoa Mug Sugar Cookies
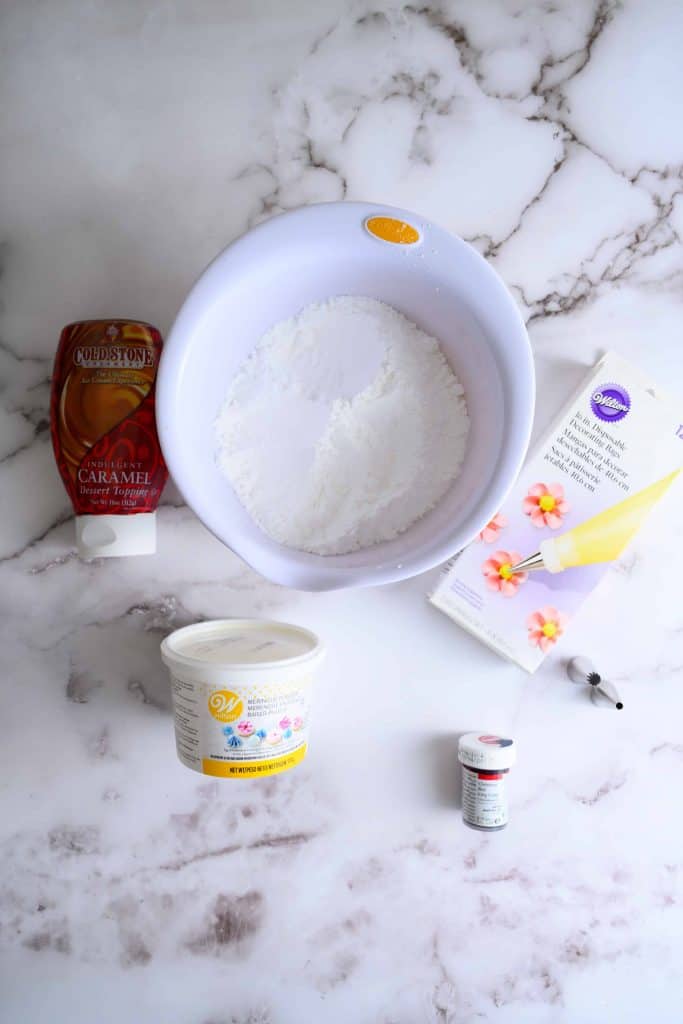
Most of the items that you need to make these cut out cookies are right in your pantry! However, there are a few items you will need to be sure to pick up ahead of time to make them. Here is what you will need:
- All-purpose flour
- Baking soda
- Salt
- Unsalted butter, room temperature
- Granulated white sugar
- Large egg
- Lemon zest
- Vanilla extract
- Caramel syrup (for decorating cookies, optional)
- Hot cocoa (optional to sprinkle on top before serving)
- Confectioners' (icing) sugar
- Wilton meringue powder
- Lukewarm water
- Red food coloring gel ( I used Wilton Christmas Red color that can be found at their store or online)
Equipment:
- Bowls
- Hand mixer
- Rolling pin
- Coffee mug cookie cutter
- Baking trays
- Parchment paper
- Wilton tip # 8 & 32
- 2 Wilton Pastry (Cake Decorating) Bags
Looking for more delicious holiday cookie recipes? Give these reader favorites a try!
Gingerbread Man Cookies Recipe with Royal Icing | Cream Cheese Sugar Cookies for Christmas | Chocolate Candy Cane Cookies
How do I make the Cocoa Mug Sugar Cookies?
While these sugar cookies look like they may be difficult to create, they actually come together in a few simple steps. Here is what you will need to do to make them
Step 1: Prepare the cookie dough
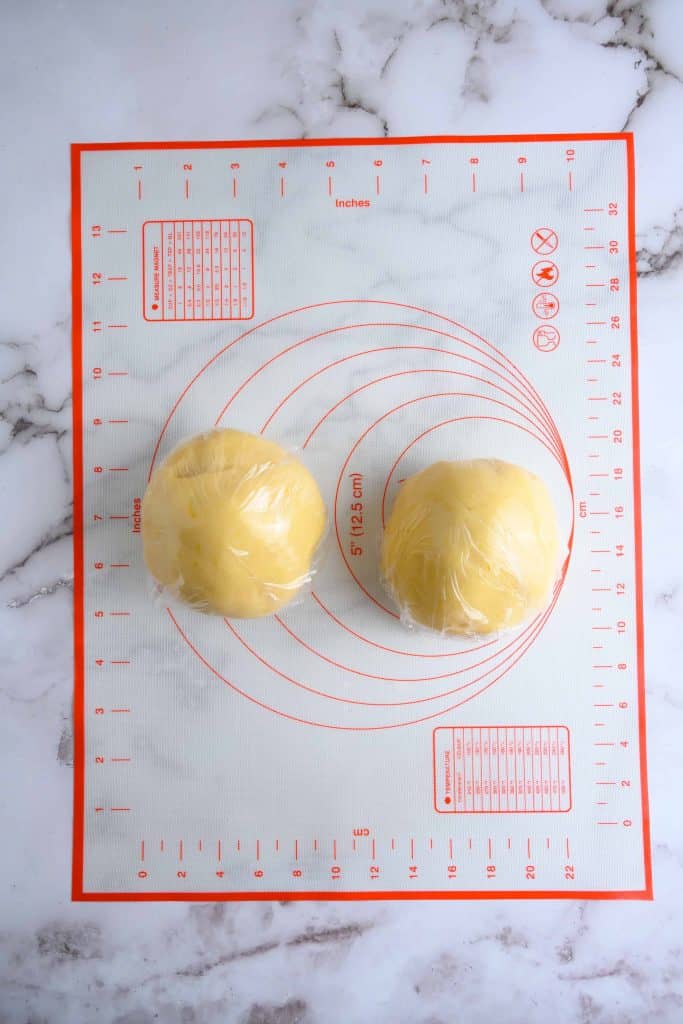
In a large bowl whisk together the flour, baking soda and salt, then set aside. In a separate bowl, use a hand mixer to beat the butter and sugar until light and fluffy. Next, add the egg, lemon zest and vanilla extract and beat until just combined. Fold the flour mixture into the butter mixture and beat until you have a nice, smooth dough. Divide the dough in half. Wrap each piece in plastic wrap and freeze for 10 minutes or until firm.
Step 2: Cut out cookies and bake
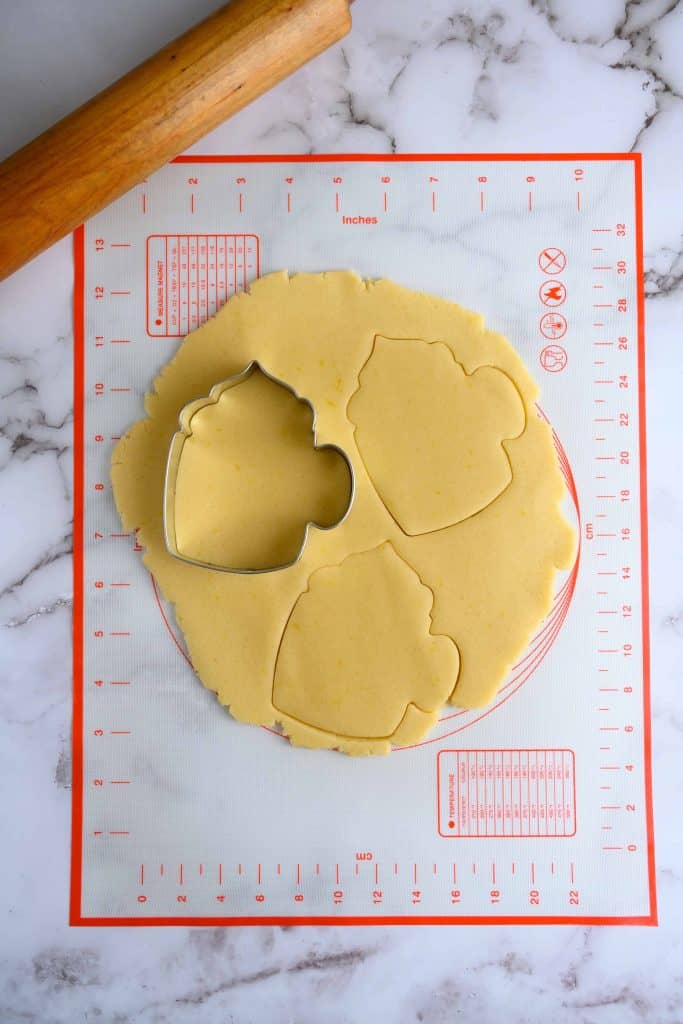
Preheat the oven to 350 Fahrenheit and line 2 baking sheets with parchment paper. Next, on a lightly floured surface, roll out the dough to ¼-in. thickness. Cut out cookies using a coffee mug cookie cutter and transfer to the prepared baking sheet. Bake for 10 minutes or until they begin to brown around the edges. Remove from the oven and allow to cool for 5 minutes, then transfer to a wire rack to finish cooling. Cookies should be cooled completely before decorating.
Step 3: Prepare the Meringue Powder Icing
In a large bowl beat the confectioners' sugar and meringue powder until combined. Gradually add the WARM water and beat until stiff peaks form, about 5 minutes. Add more sugar or water to achieve the desired consistency. The right consistency for decorating the cookies is when you lift the beater and the ribbon of icing that falls into the bowl remains on the surface of the icing for 2-3 seconds and then disappears. Set aside ¼ of the icing in a separate bowl. Then, use about ⅛ teaspoon of red food coloring gel to tint the remainder of the icing red. Use the icing immediately.
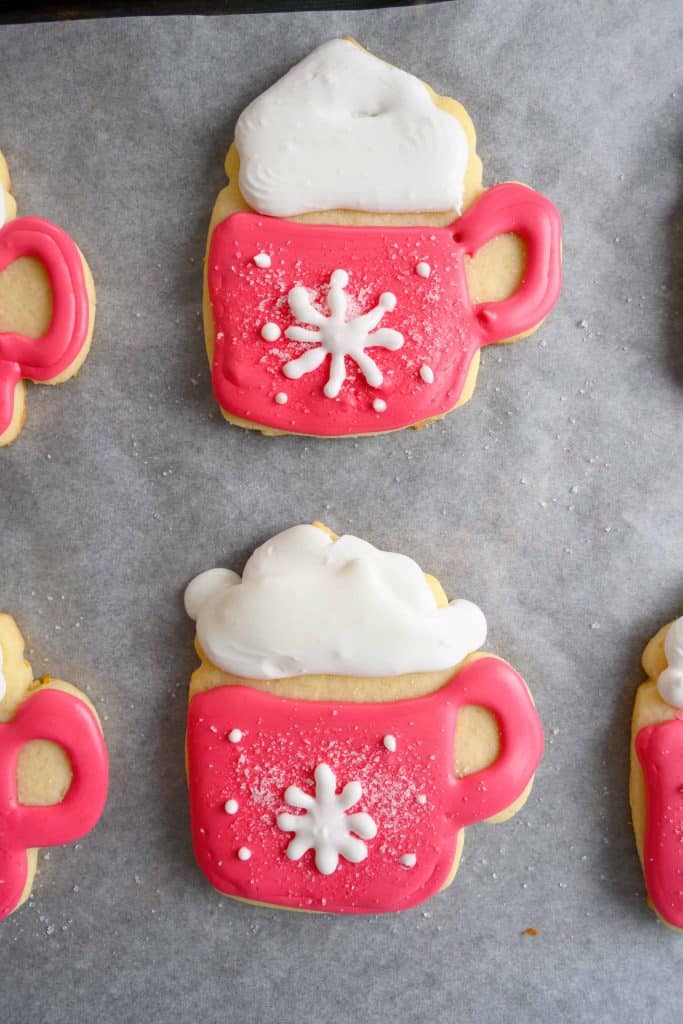
Step 4: Decorate the cookies
I used a Wilton pastry bag and Wilton tips for decorating the cookies. Transfer the icing into the icing bags. Begin decorating your least favorite cookies first, for practice. If something goes wrong, it won't matter as much. Outline the mug part of the cookie and fill it with the red royal icing. I used tip # 8 for outlining and filling "the mug part". Fill the "cream part" of the cookie with the white royal icing. I used tip # 32 for filling "the cream part". (Wilton Tips #1, 2, 3 and 4 will work as well). Then, draw a snowflake in the center of each cookie using the white royal icing. Once you've finished applying the icing to the cookie, shake it gently to help settle the bumps if there are any. Use a toothpick to fix any holes or rough spots while decorating the cookies.Optional: Draw a thin line (horizontal) with caramel between "the mug and cream part" and sprinkle a little hot cocoa powder on top before serving.
Iced Sugar Cookie Questions and Answers
How do I store the Iced Sugar Cookies?
The Hot Cocoa Mug Sugar Cookies can be stored in an airtight container for 4-5 days.
I don't have Wilton pastry bags or tips, what else can I use?
No problem, you can still easily decorate these cookies! The lines may not be as precise, but they will still look great if you take your time. For the mug part, carefully spread the red icing over the cookie with a butter Then, spread white icing over the cream part of the cookie. You can use a quart sized zip lock bag instead to make the snow flakes. Fill the bag about ½ way with the icing and roll down the top of the bag, so the icing is pushed to the bottom. Cut a very small piece of one of the corners off the bag and pipe the snow flakes onto the cookies.
Do I have to use a mug cookie cutter?
No, this sugar cookie base is great for any type of cut-out cookies you would like to make. I use it to make cut-out Christmas trees, angels and stars.


Hot Cocoa Mug Sugar Cookies
Equipment
- Bowls
- Hand Mixer
- Coffee mug cookie cutter ( see the link below)
- Baking trays
- Wilton tip # 8 & 32
- 2 Wilton Icing Bags
Ingredients
For The Cookies:
- 1 ¾ cups all-purpose flour
- 1 teaspoon baking soda
- ⅛ teaspoon salt
- ½ cup unsalted butter room temperature
- 1 cup granulated white sugar
- 1 large egg
- ¾ teaspoon lemon zest
- 2 teaspoons vanilla extract
- 2 tablespoons caramel for decorating cookies optional
For The Meringue Powder Icing:
- 2 ¼ cups confectioners’ icing sugar
- 2 tablespoons Wilton meringue powder
- ¼ cup-½ cup lukewarm water
- Red food coloring gel I used Wilton Christmas Red color that can be found at their store or online
Instructions
Sugar cookies:
- In a large bowl whisk together the flour, baking soda and salt. Set aside.
- In a separate bowl beat the butter and sugar until light, using a hand mixer.
- Add the egg, lemon zest and vanilla extract and beat until just combined.
- Fold in the flour mixture and beat until you have a smooth dough.
- Divide the dough in half. Wrap each piece in plastic wrap and freeze for 10 minutes or until firm.
- Preheat oven to 350 F. Line 2 baking sheets with parchment paper.
- On a lightly floured surface, roll out the dough to ¼-in. thickness. Cut out cookies using a coffee mug cookie cutter and transfer to the prepared baking sheet.
- Bake for 10 minutes or until they begin to brown around the edges.
- Remove from the oven and allow to cool for 5 minutes, then transfer to a wire rack to finish cooling.
- Decorate the cookies with royal icing if desired. Let the icing dry completely before storing the cookies.
The Meringue Powder Icing
- In a large bowl beat the confectioners’ sugar and meringue powder until combined.
- Gradually add the WARM water and beat until stiff peaks form, about 5 minutes. Add more sugar or water to achieve the desired consistency. The right consistency for decorating the cookies is when you lift the beater and the ribbon of icing that falls into the bowl remains on the surface of the icing for 2-3 seconds and then disappears.
- Tint ¾ of the icing with red food coloring gel. You will need about ⅛ teaspoon.
- Once the royal icing is ready, use it immediately.
Decorating the cookies:
- Use tip # 8 for outlining and filling “the mug part” of the cookie and tip # 32 for filling “the cream part”. (Wilton Tips #1, 2, 3 and 4 will work as well).
- Transfer the icing into the icing bags.
- Begin decorating your least favourite cookies first. If something goes wrong, it won’t matter as much.
- Outline the mug part of the cookie and fill it with the red royal icing.
- Fill the “cream part” of the cookie with the white royal icing.
- Draw a snowflake in the centre of each cookie using the white royal icing.
- Optional: Draw a thin line (horizontal) with caramel between “the mug and cream part”.
- Once you’ve finished applying the icing to the cookie, shake it gently to help settle the bumps if there are any.