
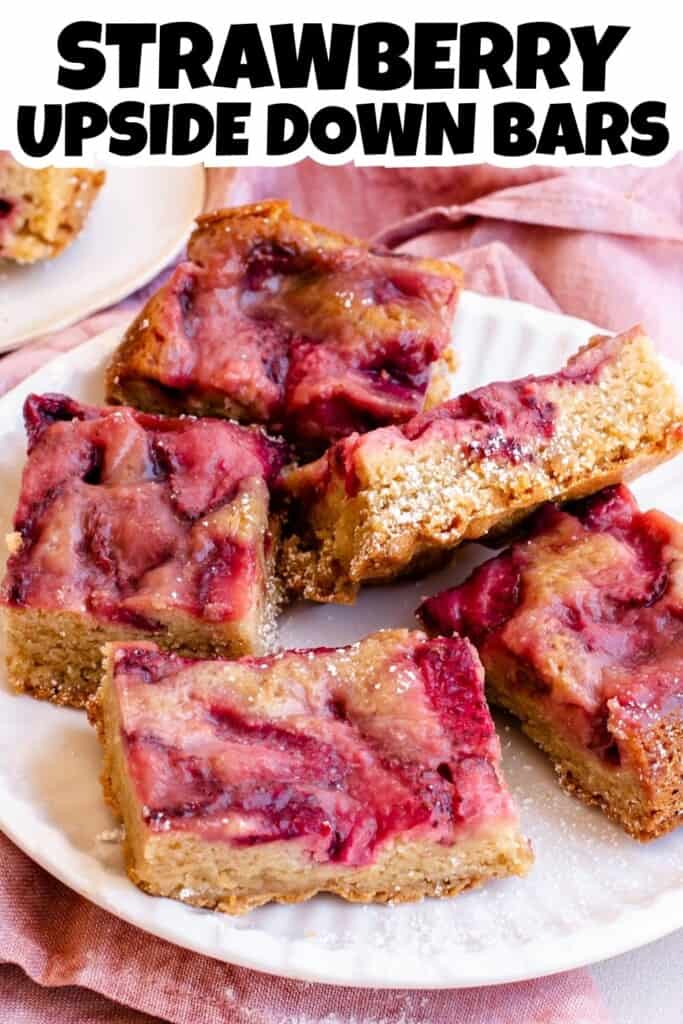
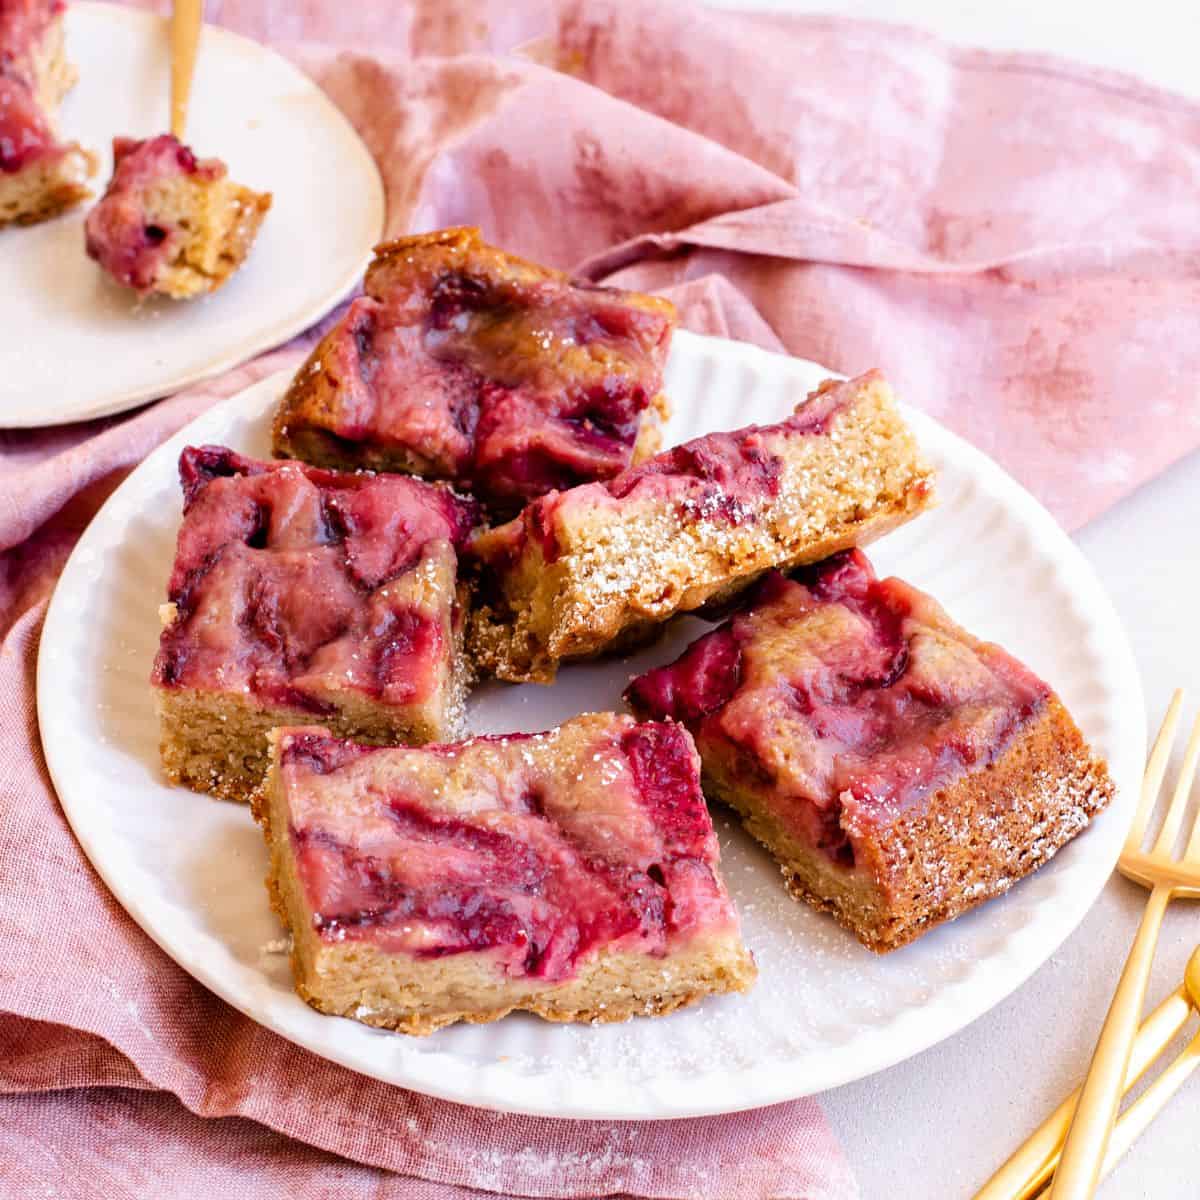
Strawberry Upside Down Bars (Easy, Jammy, and Absolutely Delicious!)


Fresh strawberries layered on the bottom of the pan, covered with a rich brown sugar batter, baked until golden - then flipped to reveal the most beautiful jammy berry top you've ever seen. These Strawberry Upside Down Bars are summer baking at its most dramatic and most delicious. Jump to Recipe if you're already convinced. Or keep reading - I promise it's worth it.
This post contains affiliate links. As an Amazon affiliate, I earn a commission on qualifying purchases.
The Best Strawberry Bars You'll Ever Make
As a nurse and a mom, I'm always looking for recipes that feel special but don't require an entire Saturday afternoon. This one delivers. The ingredient list is short, the steps are straightforward, and the payoff when you flip that pan and peel back the parchment? Pure magic. Jammy strawberries, caramelized brown sugar, a dense buttery bar underneath - it's like a strawberry shortcake bar in the best possible way.
Peak strawberry season (late spring through early summer) is when this recipe really shines, but honestly? But, it's also good enough to make year-round with whatever berries you can find.
Why You'll Love This Recipe
- No icing, no frosting, no fuss - the strawberries are built right in
- Made with pantry staples you probably already have
- Travels beautifully to picnics, potlucks, and bake sales
- Just 15 minutes of prep time
- Naturally egg-based with no leavening tricks - just solid, simple baking
- Stunning presentation with zero decorating required
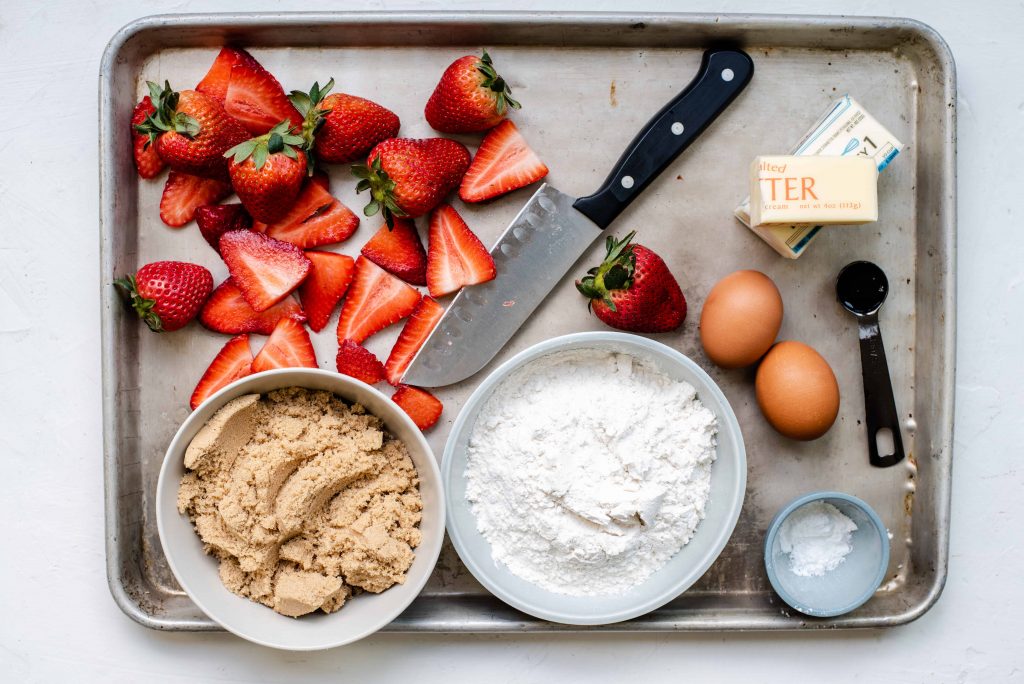
What You Need (Ingredients + Notes)
This recipe uses simple, everyday baking ingredients. Here's what to grab:
For the Pan:
- 1 tablespoon unsalted butter, softened
- 3 tablespoons packed light brown sugar
- 2 cups fresh strawberries, hulled and thinly sliced (about ¼ inch thick)
Dry Ingredients:
- 1½ cups all-purpose flour
- 1 teaspoon baking powder
- ¼ teaspoon salt
Wet Ingredients:
- ¾ cup (1½ sticks) unsalted butter, melted and slightly cooled
- 1¼ cups light brown sugar, packed
- 2 large eggs
- 2 teaspoons pure vanilla extract
For Serving:
- Powdered sugar for dusting (optional, but pretty)
Ingredient Notes + Substitution Tips
Strawberries: Fresh is best here - frozen strawberries release too much water and make the bars soggy. Medium-sized berries are ideal. Slice them about ¼ inch thick for even baking and clean release.
Brown sugar: Light brown sugar is used throughout this recipe. The molasses notes in brown sugar caramelize beautifully with the strawberries and give the bars their rich, almost toffee-like depth. Don't substitute white sugar here.
Butter: Use unsalted so you can control the salt level. The butter for the pan should be softened (spreadable), while the butter in the batter should be melted and slightly cooled - not hot, or it may scramble your eggs.
Flour: All-purpose is the move. I haven't tested this with gluten-free flour blends, but a 1:1 GF substitute should work reasonably well if that's what your family needs.
Eggs: Two large eggs give the bars their structure. Room temperature eggs incorporate more smoothly - pull them out of the fridge 20 minutes before you start.
How to Make Strawberry Upside Down Bars (Step by Step)
Prep time: 15 minutes | Cook time: 40-45 minutes | Cool time: 1 hour | Serves: 12
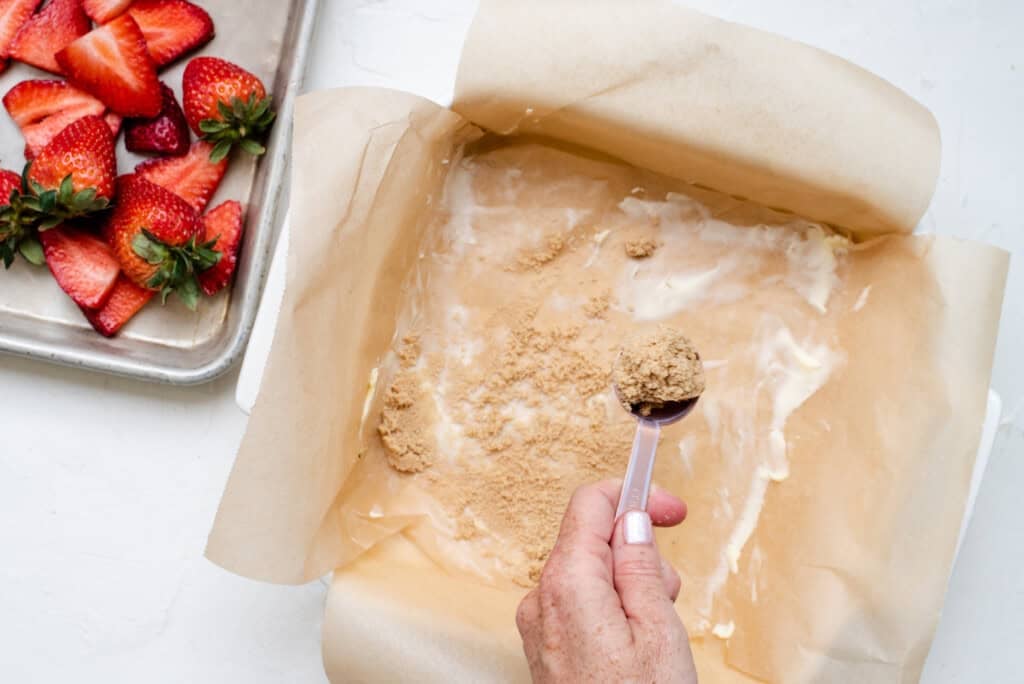
Phase 1: Prepare Your Pan
- Step 1: Preheat your oven to 350°F and position the rack in the center of the oven.
- Step 2: Line an 8×8-inch baking pan with parchment paper, leaving a couple inches of overhang on two opposite sides. This overhang acts as handles for easy removal if you don't want to do the full flip.
- Step 3: Grease the parchment generously with the 1 tablespoon of softened butter. Don't be shy here - this step is crucial for a clean release.
- Step 4: Sprinkle the 3 tablespoons of packed light brown sugar evenly over the buttered parchment and spread into a flat layer.
Phase 2: Layer the Strawberries
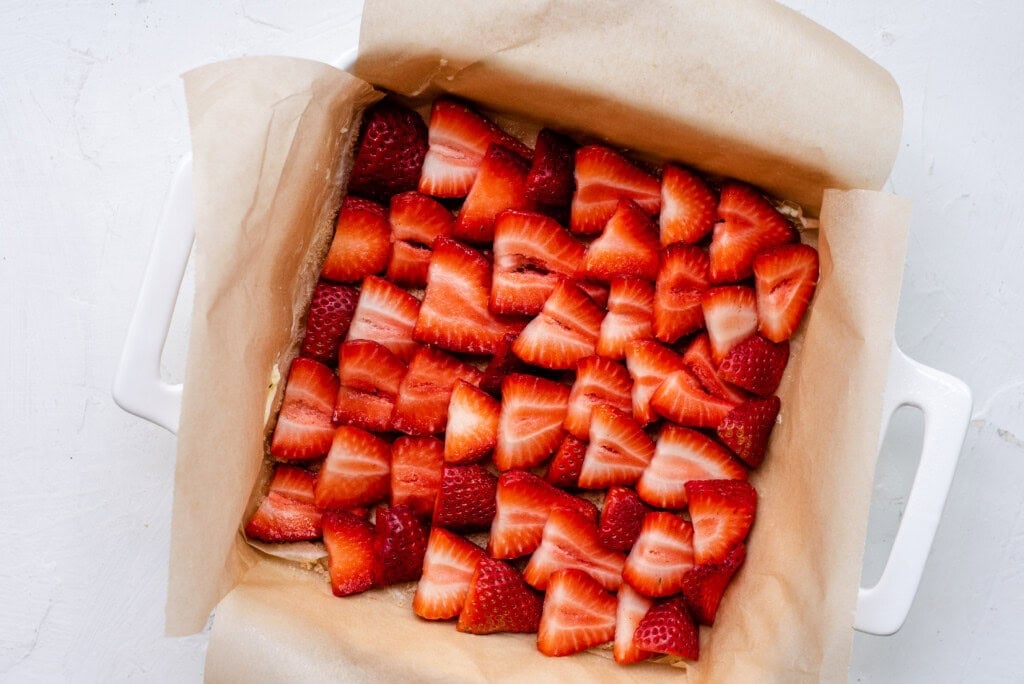
- Step 5: Arrange your sliced strawberries across the bottom of the pan in overlapping rows, covering the entire surface. I like to slice my berries vertically through the stem end so the slices are more uniform and pretty once flipped.
- Step 6: Set the pan aside while you make the batter.
Phase 3: Make the Batter
- Step 7: In a medium bowl, whisk together the flour, baking powder, and salt. Set aside.
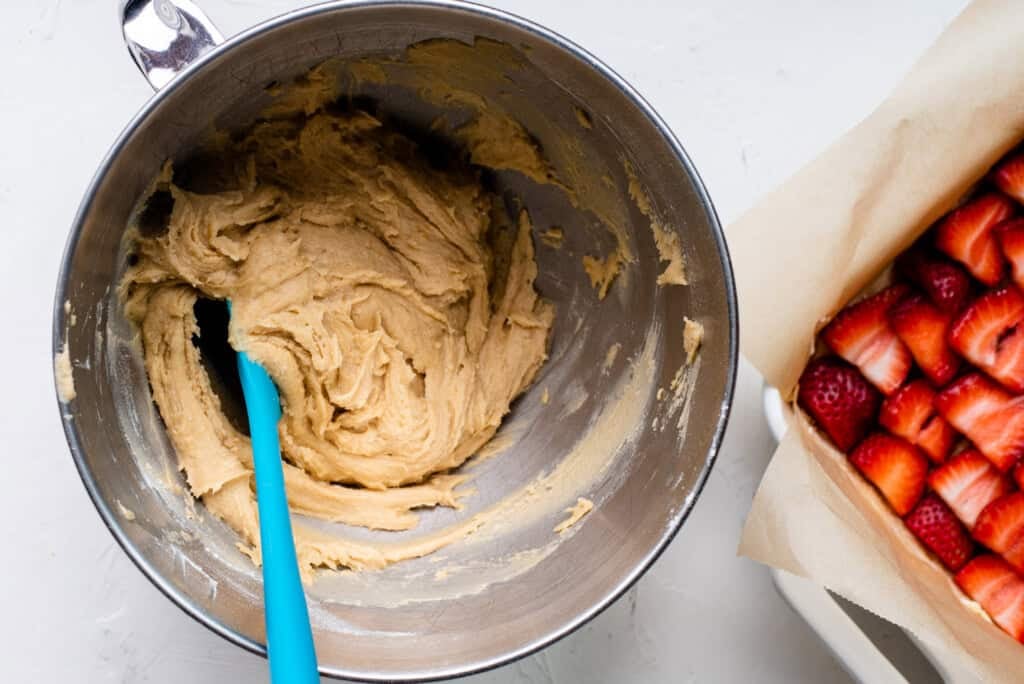
- Step 8: In a large bowl (or in your stand mixer), beat together the melted butter and 1¼ cups packed light brown sugar until well combined - it should look glossy and smooth.
- Step 9: Reduce mixer speed to low and add the eggs and vanilla extract. Mix until fully incorporated.
- Step 10: Add the flour mixture and mix until just combined. The batter will be thick - that's exactly right.
Phase 4: Assemble and Bake
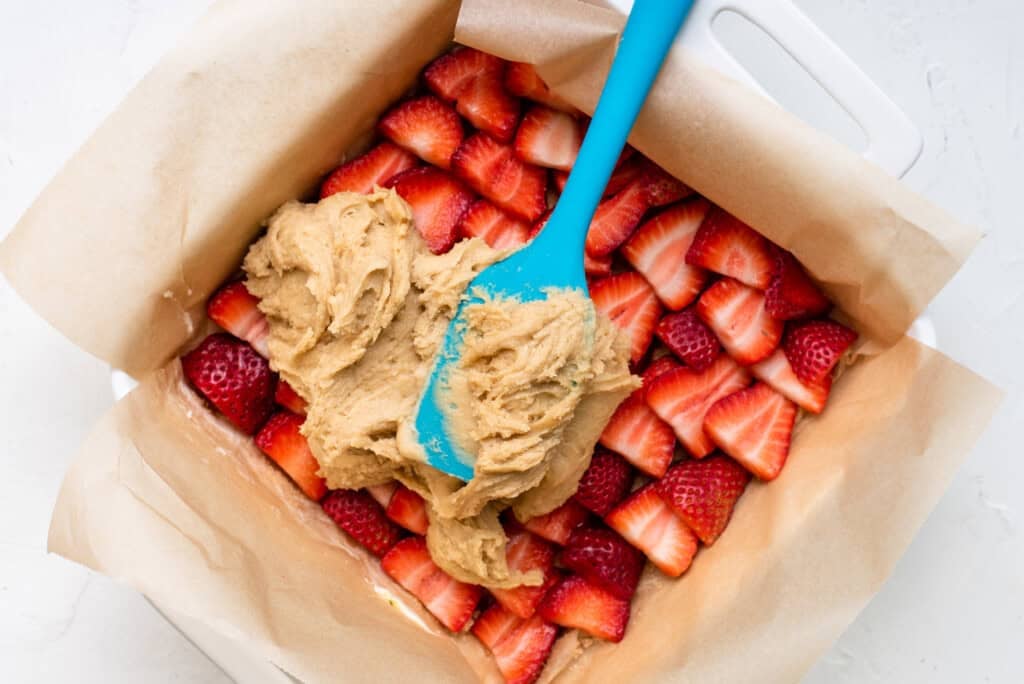
- Step 11: Drop spoonfuls of batter over the strawberry layer, distributing it as evenly as you can. Using a spatula, gently spread the batter across the top using short, careful strokes. You're trying not to disturb the strawberry layer underneath - take your time.
- Step 12: Bake for 40-45 minutes, until the top is deep golden brown and a toothpick inserted in the center comes out clean. The long bake time is normal! Fresh strawberries release moisture into the batter, which slows things down. Start checking at 35 minutes since every oven runs a little different.
Phase 5: Cool and Flip
- Step 13: Remove the pan from the oven and place it on a wire cooling rack. Let the bars cool completely - at least 1 hour. I know it's hard to wait, but this step is non-negotiable. Warm bars will crumble when flipped.
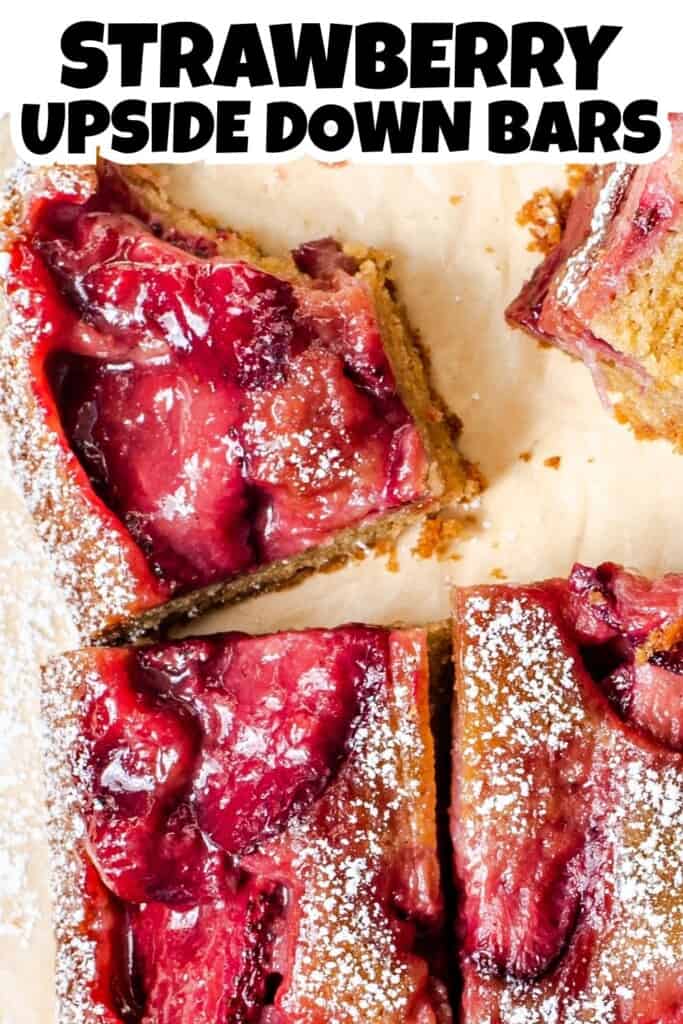
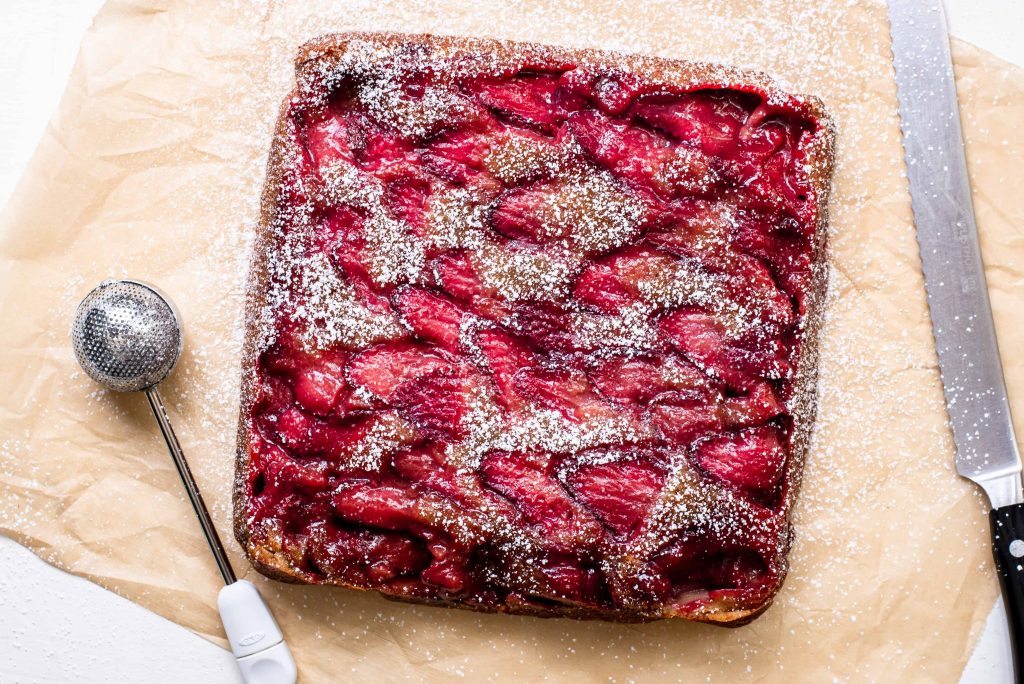
- Step 14: When fully cool, place a large cutting board or flat serving platter firmly over the top of the pan. Hold both together securely with both hands, take a breath, and flip in one confident motion. Set down and lift the pan straight up.

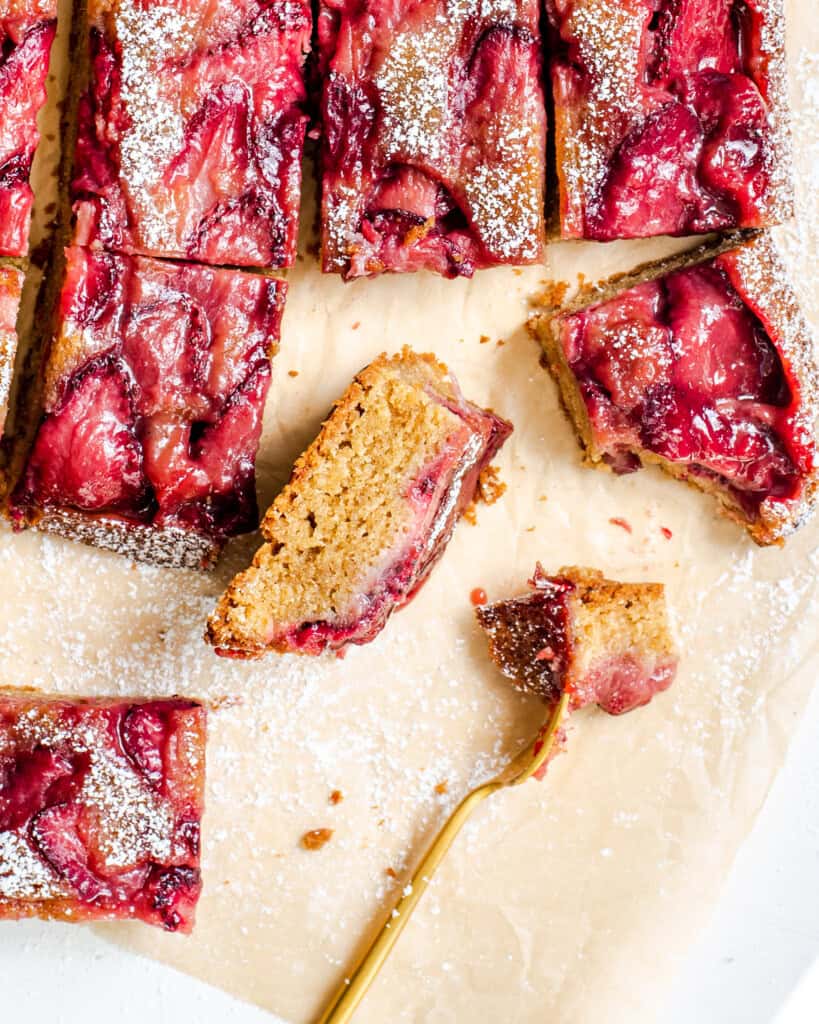
- Step 15: Carefully peel back the parchment paper. If a few strawberry slices stick, just press them gently back into place - it's an easy fix and happens to everyone.
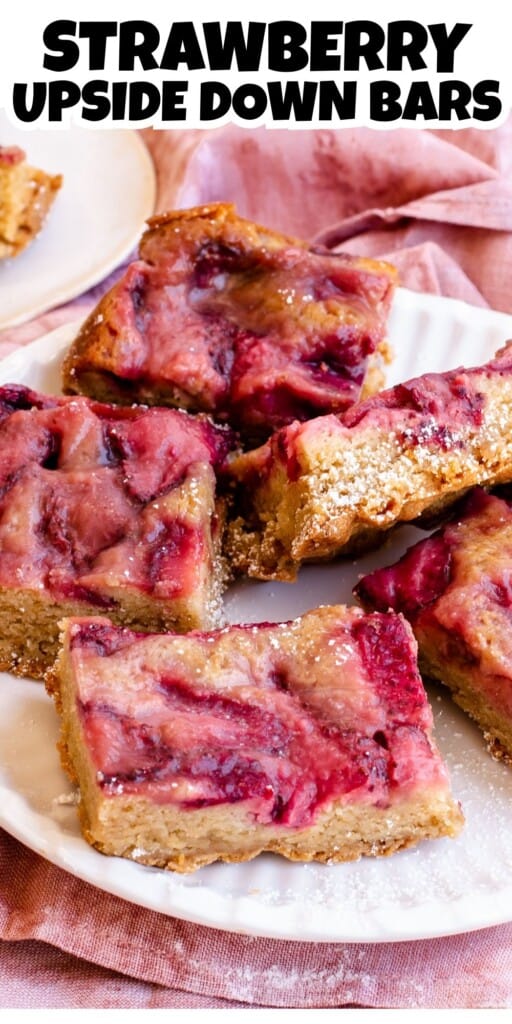
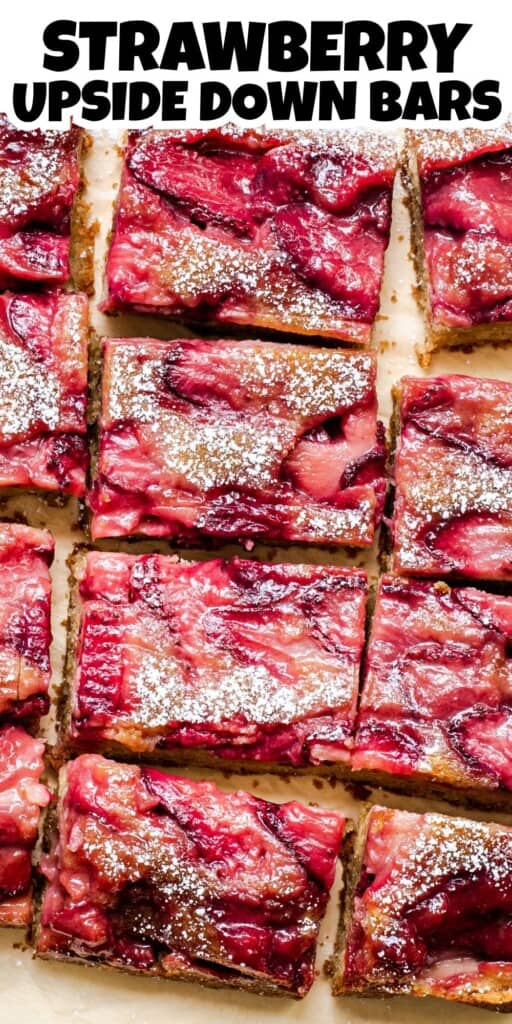
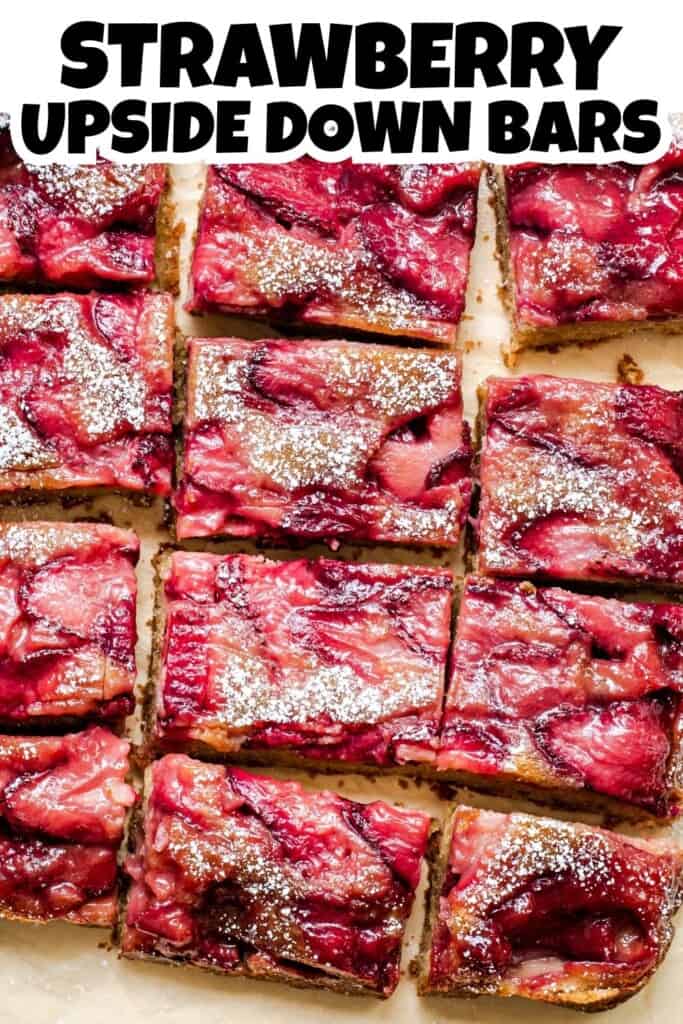
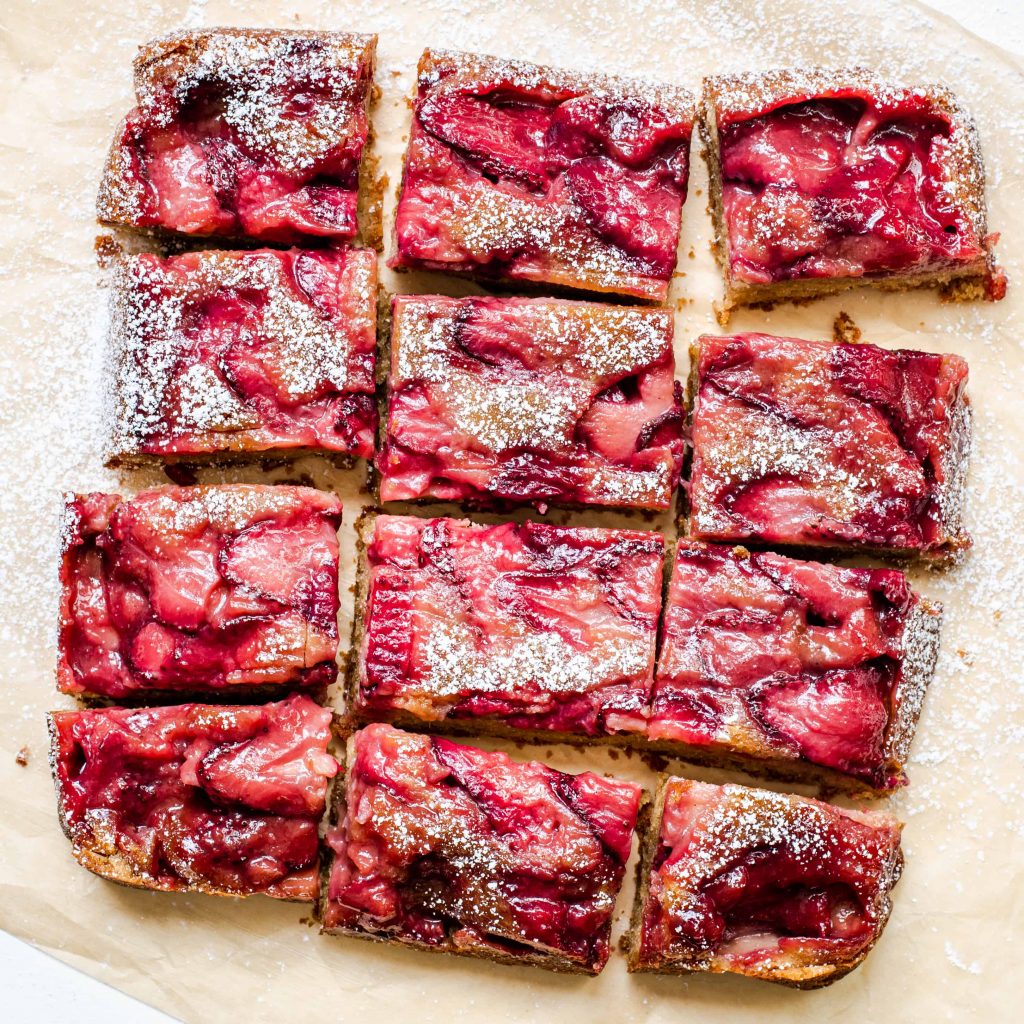
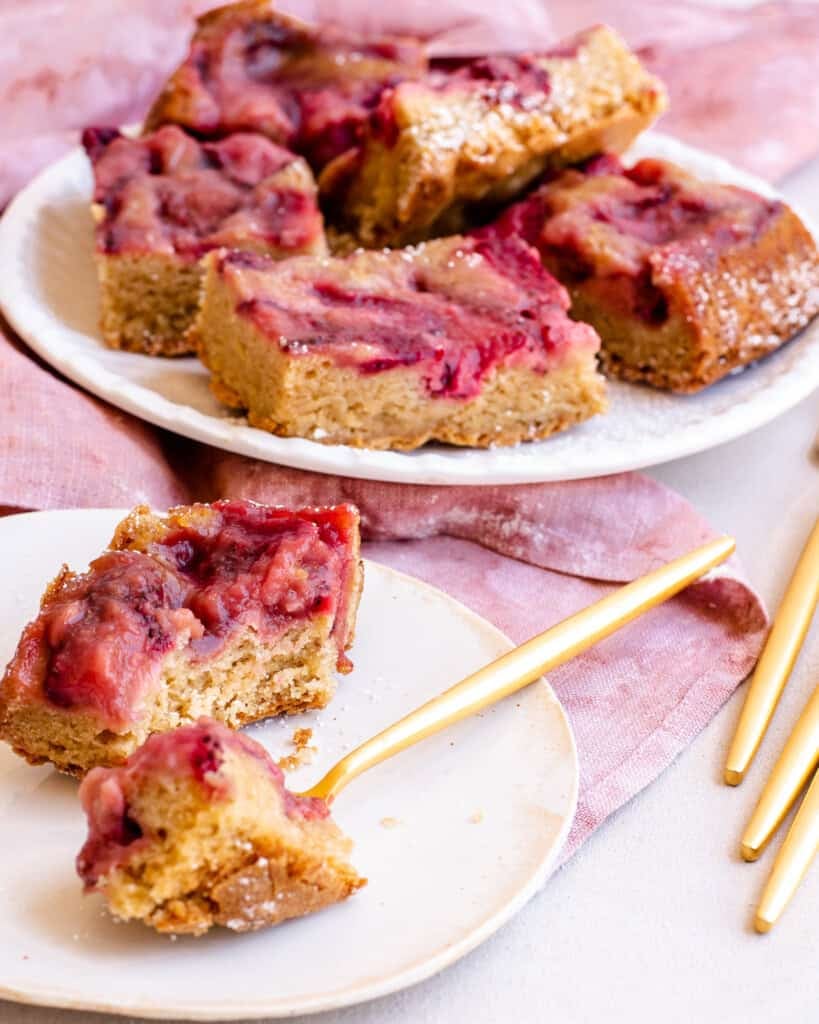
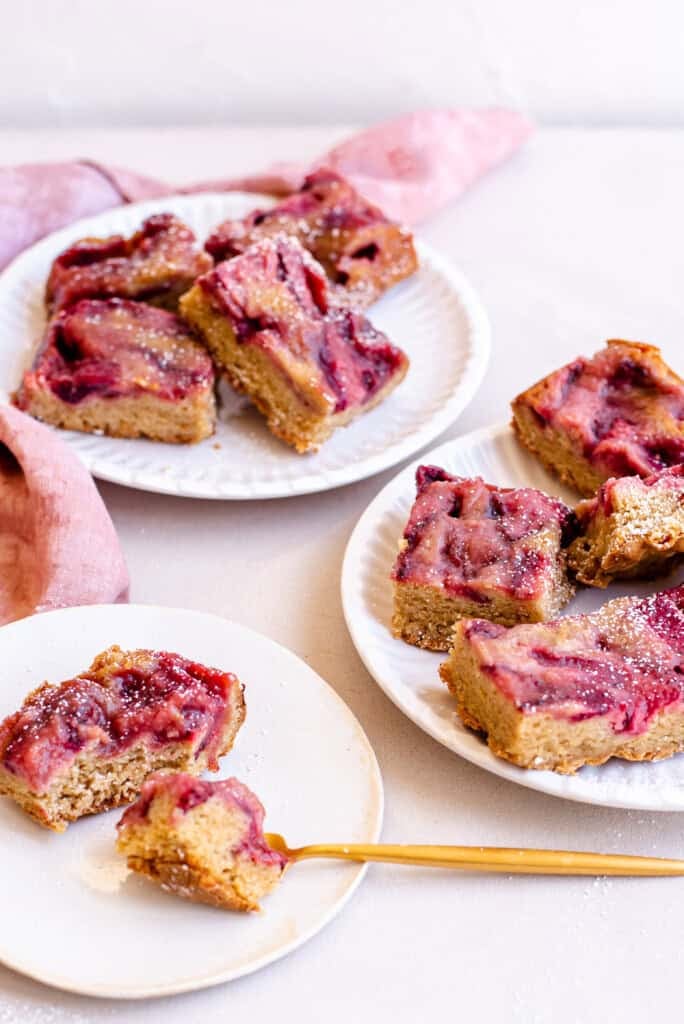
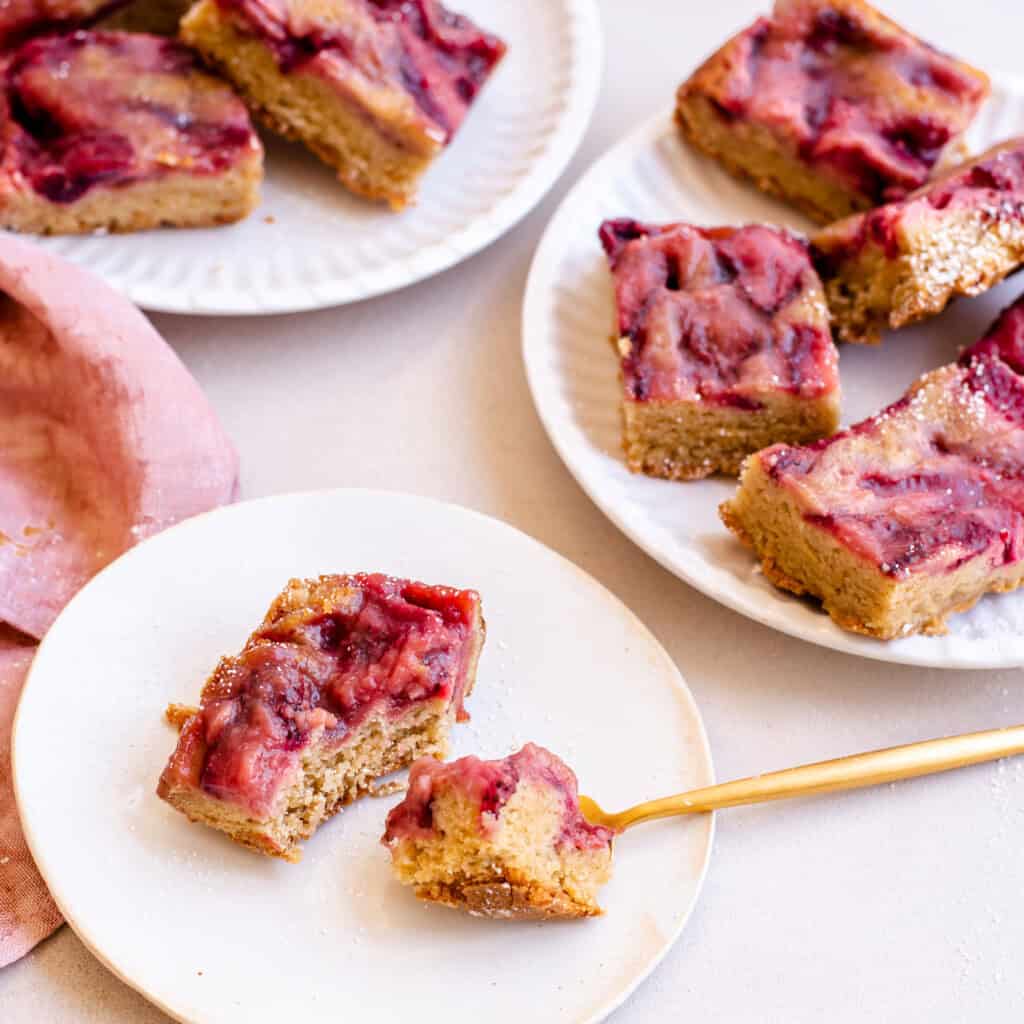
- Step 16: Slice into 12 squares with a sharp knife, wiping the blade between cuts for clean edges. Dust with powdered sugar just before serving if you'd like a little extra prettiness.
 Angela's Pro Tips
 Angela's Pro Tips
Cool completely before flipping - no exceptions. The full hour of cooling is what allows the bars to firm up and set so they release cleanly. If you're in a rush, pop the pan in the refrigerator for 30 minutes after the initial cooldown. Cold bars flip better.
Commit to the flip. Hesitation is the enemy. Place your cutting board directly on the pan, grip firmly with both hands, and flip in one quick, confident motion. No wavering!
Slice strawberries thin and even. About ¼ inch thick works best. Thick slices create air pockets under the batter. Very large berries can be halved lengthwise before slicing.
Watch for visual doneness cues. The top should be deep golden brown and feel firm when gently pressed in the center. A toothpick inserted in the middle should come out clean - not wet or sticky.
Make ahead-friendly. These bars are actually great made a day ahead. Bake, cool completely, flip, then loosely cover and refrigerate overnight. The flavors deepen beautifully by the next day.
How to Keep Upside Down Bars from Sticking
There is nothing more heartbreaking than a stuck upside-down cake. Here's how to make sure yours releases perfectly every time:
- Parchment paper: Use parchment paper - not just greased foil or a bare pan. The parchment is your insurance policy.
- Butter the pan well: Be generous with the butter. Coat the parchment and the sides of the pan so there's no dry spot for the batter to grab.
- Tap before lifting: If your bars are being stubborn, tap firmly on the bottom of the pan with the handle of a wooden spoon before attempting to lift it. A few firm taps is usually all it takes.
- Cool completely: Wait the full hour. Most sticking problems happen because bars are flipped too soon while the bottom is still soft and wet.
Serving Suggestions
These bars are complete on their own with just a dusting of powdered sugar, but here are a few ways to take them over the top:
- A scoop of vanilla bean ice cream alongside a warm-ish bar is basically perfect
- A dollop of fresh whipped cream for a lighter topping
- A drizzle of melted dark chocolate - strawberry and chocolate are a classic for a reason
- A side of lemon curd for a bright, tart contrast to the sweet bars
- Sliced fresh strawberries on the side to reinforce that berry flavor
Recipe Variations
Peach Upside Down Bars: Swap the strawberries for thinly sliced ripe peaches. They caramelize even more dramatically than berries.
Mixed Berry Version: Use a combination of sliced strawberries and raspberries. Keep the total fruit amount the same and slice everything to a similar thickness.
Strawberry Lemon: Add 1 tablespoon of lemon zest to the batter and a squeeze of fresh lemon juice over the strawberries before baking for a bright citrus note.
Pineapple Upside Down Bars: Swap the strawberries for canned pineapple rings (patted very dry) and add a maraschino cherry to the center of each ring. Classic vibes.
Apple Cinnamon Version: Use thinly sliced apples and add ½ teaspoon of cinnamon to the batter. Perfect for fall baking.
When Rainiers come into season in late June, this same fruit-and-crumble approach works beautifully - try our Rainier cherry crumble for a mid-summer rotation.
Storage Instructions
Room temperature: Store in an airtight container at room temperature for up to 2 days.
Refrigerator: Because these bars contain fresh strawberries, they'll last longer in the fridge - up to 4 days in an airtight container. They're actually wonderful cold!
Freezer: I don't recommend freezing these bars. The strawberry layer doesn't hold up well through a freeze-thaw cycle and tends to get watery and soft.
Best within: These bars are at their absolute best within the first 2 days. The strawberry layer is jammy and vivid, the bars are moist, and the caramelized sugar is still working its magic.
Frequently Asked Questions
Can I use frozen strawberries?
I don't recommend it for this recipe. Frozen berries release a significant amount of moisture as they thaw and bake, which makes the bars wet and difficult to flip cleanly. Fresh strawberries are key to the texture and the beautiful caramelized result.
My bars fell apart when I flipped them - what went wrong?
Almost always, this comes down to flipping before the bars were completely cool. The batter needs the full 1 hour (or longer in the fridge) to firm up enough to hold together when inverted. Let patience be your best baking tool here.
Can I make these in a 9×13 pan?
You can, but you'll need to scale the recipe up (roughly 1.5x the ingredients) and reduce the bake time by about 10-15 minutes. Start checking for doneness at 30 minutes with a toothpick.
Do I have to flip them? Can I just serve from the pan?
Absolutely! If the flip feels too risky, just serve them straight from the pan using the parchment paper overhang to lift them out and slice. They won't have the dramatic jammy-top presentation, but they'll taste just as incredible.
How do I know when the bars are done?
Look for a deep golden brown top that feels firm to the touch, and a toothpick that comes out clean from the center. The bars will continue to firm up as they cool, so don't overbake chasing a drier toothpick.
Strawberry Upside Down Bars
Equipment
Ingredients
For the Pan:
- 1 tablespoon unsalted butter softened
- 3 tablespoons packed light brown sugar
- 2 cups fresh strawberries hulled and thinly sliced (about ¼ inch thick)
Dry Ingredients:
- 1½ cups all-purpose flour
- 1 teaspoon baking powder
- ¼ teaspoon salt
Wet Ingredients:
- ¾ cup 1½ sticks unsalted butter melted and slightly cooled
- 1¼ cups light brown sugar packed
- 2 large eggs
- 2 teaspoons pure vanilla extract
For Serving:
- Powdered sugar for dusting (optional)
Instructions
- Preheat: Position oven rack in the center of the oven and preheat to 350°F. Line an 8×8-inch baking pan with parchment paper, leaving some overhang on two sides for easy removal.
- Butter and sugar the pan: Grease the parchment with the 1 tablespoon softened butter, then sprinkle with 3 tablespoons packed light brown sugar, spreading into an even layer.
- Arrange strawberries: Layer the sliced strawberries across the bottom of the pan in overlapping rows, covering the entire surface. Set aside. Note: I like to slice the strawberries vertically, so the slices are more uniform.
- Combine dry ingredients: In a medium bowl, whisk together flour, baking powder, and salt. Set aside.
- Mix wet ingredients: In a large bowl, beat together the melted butter and 1¼ cups packed light brown sugar until well combined.
- Add eggs and vanilla: Add the eggs and vanilla extract to the butter mixture; mix on low speed until incorporated.
- Combine: Add the flour mixture and mix until fully combined. The batter will be thick.
- Spread batter: Drop spoonfuls of batter over the strawberry layer. Using short, careful strokes with a spatula, spread into an even layer, taking care not to disturb the strawberries below.
- Bake: Bake for 40-45 minutes, until the top is deep golden brown and a toothpick inserted in the center comes out clean.
- Cool completely: Let the bars cool in the pan on a wire rack for at least 1 hour. Do not attempt to invert until completely cool.
- Turn out: Place a cutting board or large flat plate firmly over the top of the pan. Holding both together securely, flip in one confident motion. Set down and lift the pan straight up.
- Remove parchment: Carefully peel back the parchment paper. If any strawberries stick, press them gently back into place.
- Slice: Cut into 12 squares with a sharp knife, wiping the blade between cuts for clean edges. Dust with powdered sugar just before serving, if desired.
Notes
Store bars in an airtight container at room temperature for up to 2 days, or refrigerate for up to 4 days. Because of the fresh strawberries, these bars are best enjoyed within the first 2 days. They do not freeze well.
ANGELA’S TIPS
Visual cues for doneness: The top should be deep golden brown and feel firm when gently pressed in the center. A toothpick inserted in the middle should come out clean — not wet or sticky. The long bake time is normal; fresh strawberries release a lot of moisture into the batter, which slows things down. Start checking at 35 minutes, since every oven is a little different.
Cool completely before inverting: This is the most important tip! Warm bars will fall apart when flipped. The full hour of cooling allows the bars to firm up and set so they release cleanly. If you’re short on time, refrigerate for 30 minutes after the initial cooldown before inverting.
The flip: Place your cutting board directly over the pan, hold them firmly together with both hands, and flip in one confident motion — no hesitation. Lift the pan straight up. Have a small spatula nearby in case any berries need to be nudged back into place; it’s an easy fix.
Strawberry prep matters: Thin, even slices (¼ inch) work best — they bake into the bars more evenly and release more cleanly when inverted. Very thick slices can create air pockets under the batter. Medium-sized berries are ideal; very large berries can be halved lengthwise before slicing.
Variations: Raspberries or a mix of sliced peaches and strawberries work beautifully here. Keep the total fruit amount the same and slice everything to a similar thickness so the batter covers evenly.
Nutrition
This post was originally published on 7/3/2022 and updated on 3/15/2026.

6 Comments