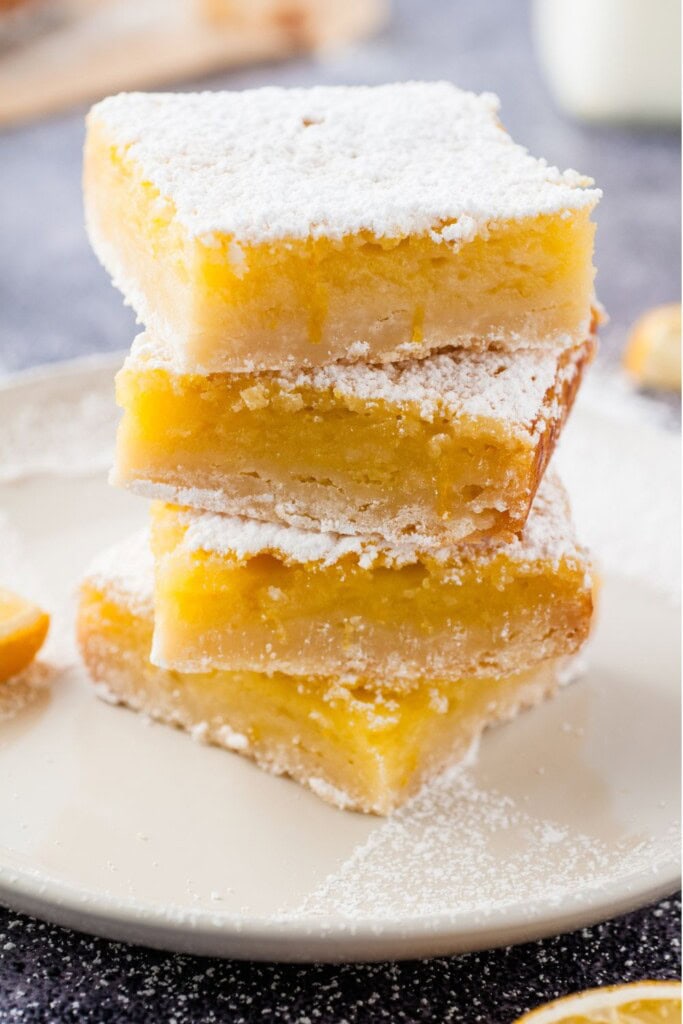
Easy Lemon Bars Recipe — Buttery Shortbread Crust


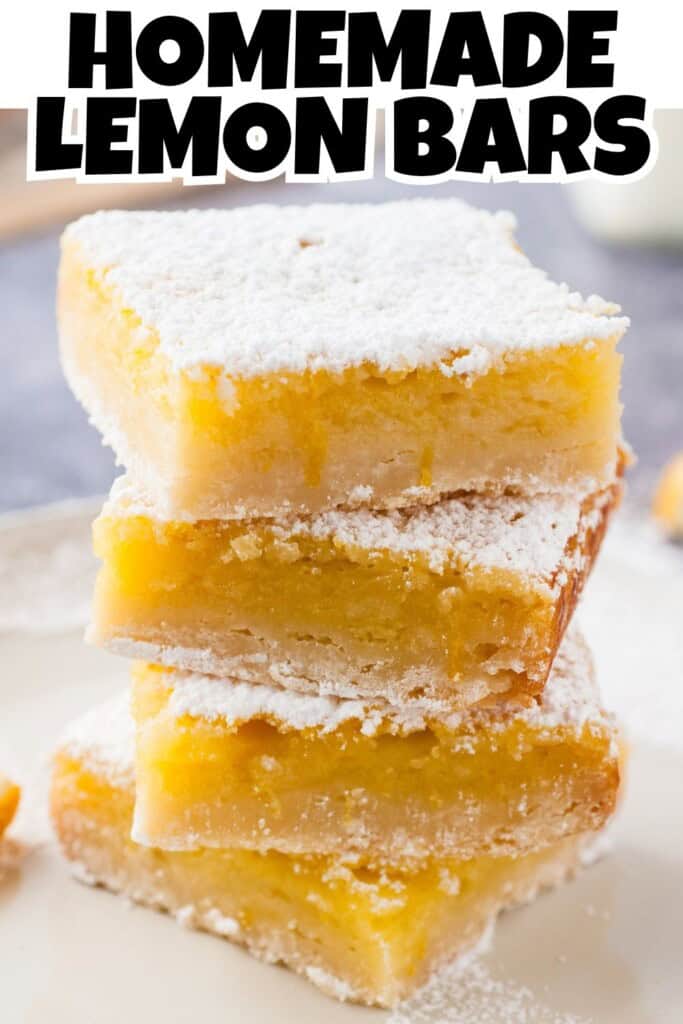
Lemon bars have been part of my holiday baking rotation for as long as I can remember - and every single time I set a pan out at a party, they're the first thing to disappear. There's something about that combination of buttery, crumbly shortbread and bright, tangy lemon filling that just works, no matter the occasion.
Disclosure: This post contains affiliate links. As an Amazon affiliate, I earn a commission from qualifying purchases.
My daughter and I have tested this version more times than I can count, tweaking the filling ratio and crust thickness until we landed on exactly what we were looking for: bars that slice cleanly, hold their shape, and taste as good on day three as they do the day they're made.
Whether you're making these for a holiday cookie tray, a potluck, or just because you have lemons on the counter, this is the lemon bar recipe you'll come back to every time. And if you love a buttery shortbread base, you might also enjoy my Raspberry Shortbread Cookies - another recipe that disappears fast.
Why You'll Love These Easy Lemon Bars
- Truly foolproof. Step-by-step instructions with visual cues so you always know exactly what you're looking for.
- Classic flavors, perfected. A buttery melt-in-your-mouth shortbread crust topped with silky, tangy lemon custard filling.
- Simple pantry ingredients. Flour, butter, sugar, eggs, and fresh lemons - nothing unusual, nothing hard to find.
- Make-ahead friendly. They actually slice better after an overnight chill, making them perfect for holiday prep.
- Holiday-ready. Beautiful on a dessert tray and easy to cut into neat squares or smaller bars for a crowd.
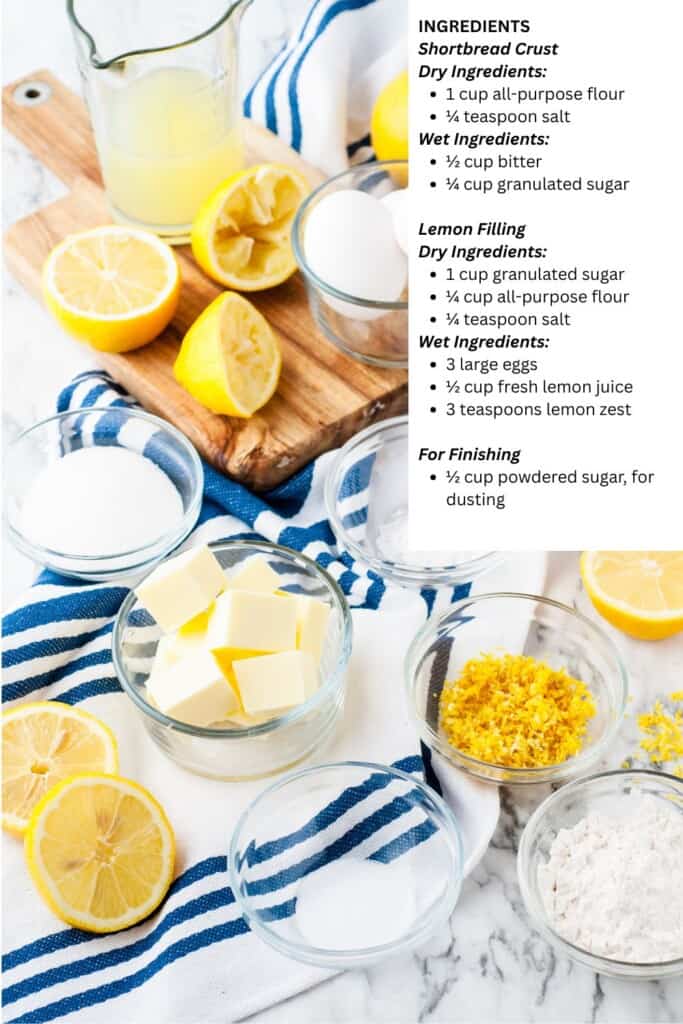
Ingredients for Lemon Bars
Here's everything you need. Full amounts are in the recipe card below.
For the Shortbread Crust
- All-purpose flour
- Salt
- Unsalted butter, softened to room temperature- softened butter (not melted) is important here for the right crumbly texture
- Granulated sugar
For the Lemon Filling
- Granulated sugar
- All-purpose flour - this is what gives the filling its structure and clean-slicing edge
- Salt
- Large eggs
- Fresh lemon juice (about 2-3 lemons) - fresh-squeezed makes a real difference in flavor
- Lemon zest - always zest your lemons before you juice them!
For Finishing
- Powdered sugar, for dusting just before serving
| 💡 Angela's Tip
Always zest your lemons before juicing them - once a lemon is juiced, it's nearly impossible to zest. One lemon typically gives you about 1 teaspoon of zest and 2-3 tablespoons of juice. |
How to Make Lemon Bars Step by Step
Step 1 - Make the Shortbread Crust
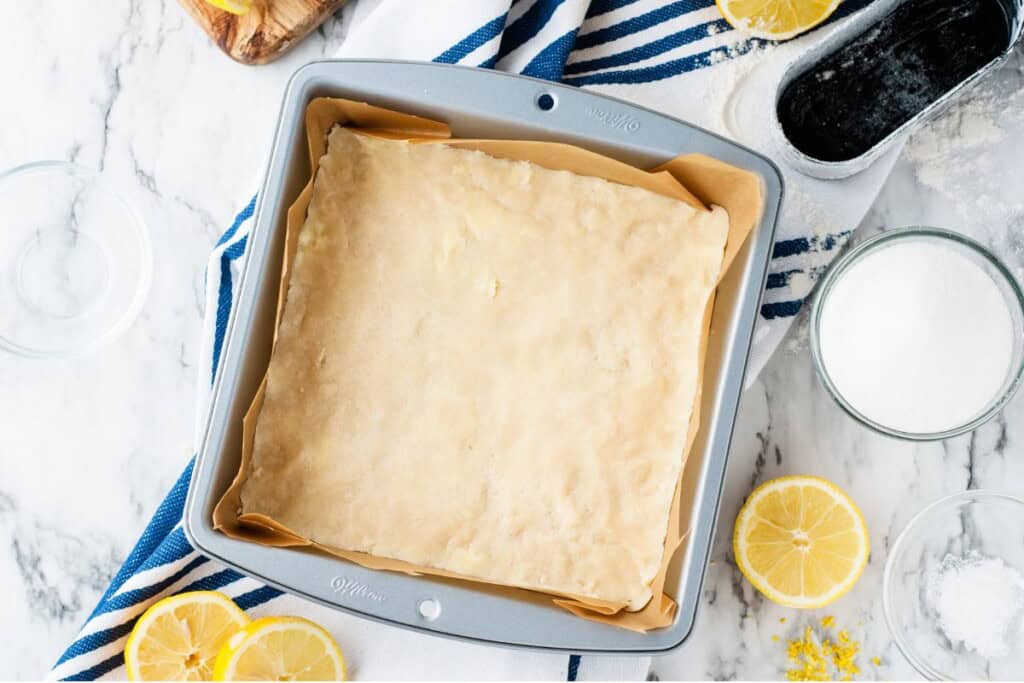
- Preheat your oven to 325°F and position the rack in the center. Line an 8×8-inch baking pan with parchment paper, leaving overhang on two sides so you can lift the bars out cleanly.
- In a medium bowl, combine the flour, salt, softened butter, and granulated sugar. Use a fork or your fingertips to work the butter into the dry ingredients until fully incorporated. The dough should be soft and hold together when you press a pinch between your fingers.
- Press the dough firmly and evenly into the bottom of the prepared pan. Use the flat bottom of a measuring cup to pack it smooth and level.
- Bake for 20 minutes, until the crust is set and lightly golden around the edges.
Step 2 - Make the Lemon Filling
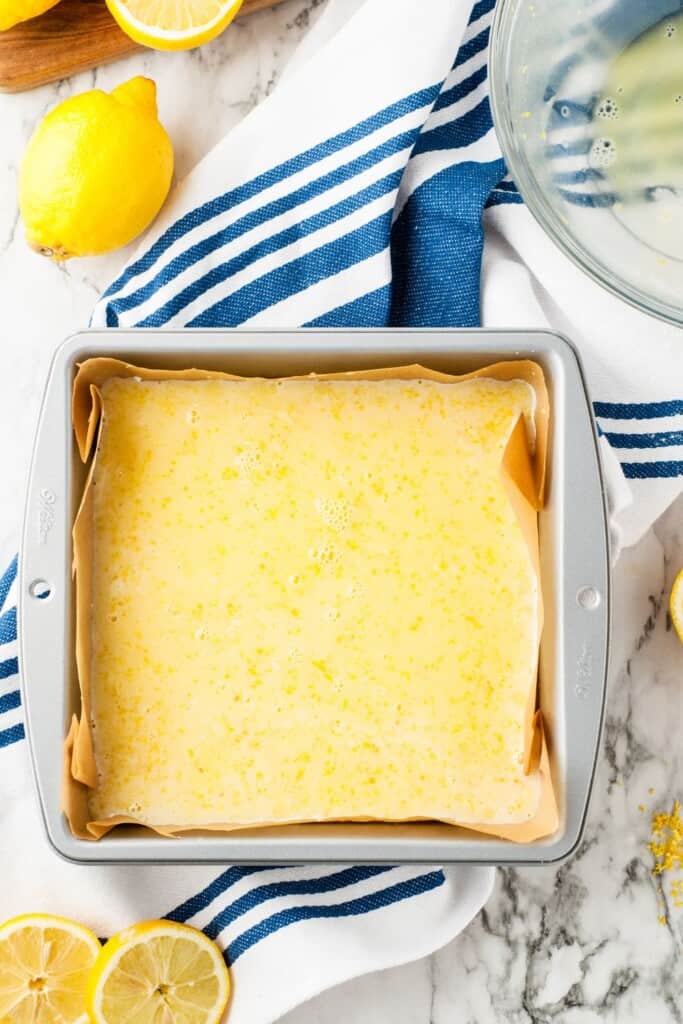
- While the crust bakes, whisk together the granulated sugar, flour, and salt in a large bowl.
- Add the eggs, lemon juice, and lemon zest and whisk vigorously until completely smooth and well combined, about 1 minute.
Step 3 - Assemble and Bake
- As soon as the crust comes out of the oven, immediately pour the lemon filling over the hot crust. Do not let the crust cool first - the heat from the crust helps the filling bond to it and prevents the layers from separating.
- Return the pan to the oven and bake for an additional 25 minutes, until the filling is just set and no longer jiggles in the center when the pan is gently shaken.
Step 4 - Cool, Chill, and Cut
- Let the bars cool completely on a wire rack, about 1 hour.
- Once fully cooled, cover loosely with plastic wrap and refrigerate for at least 1 hour before cutting. Overnight is even better.
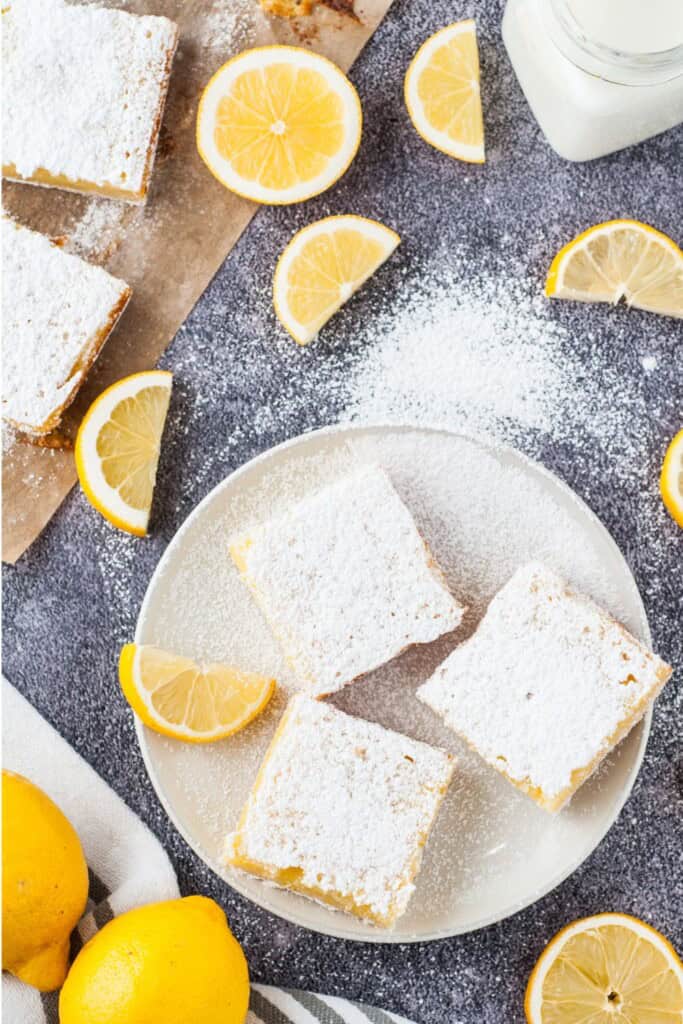
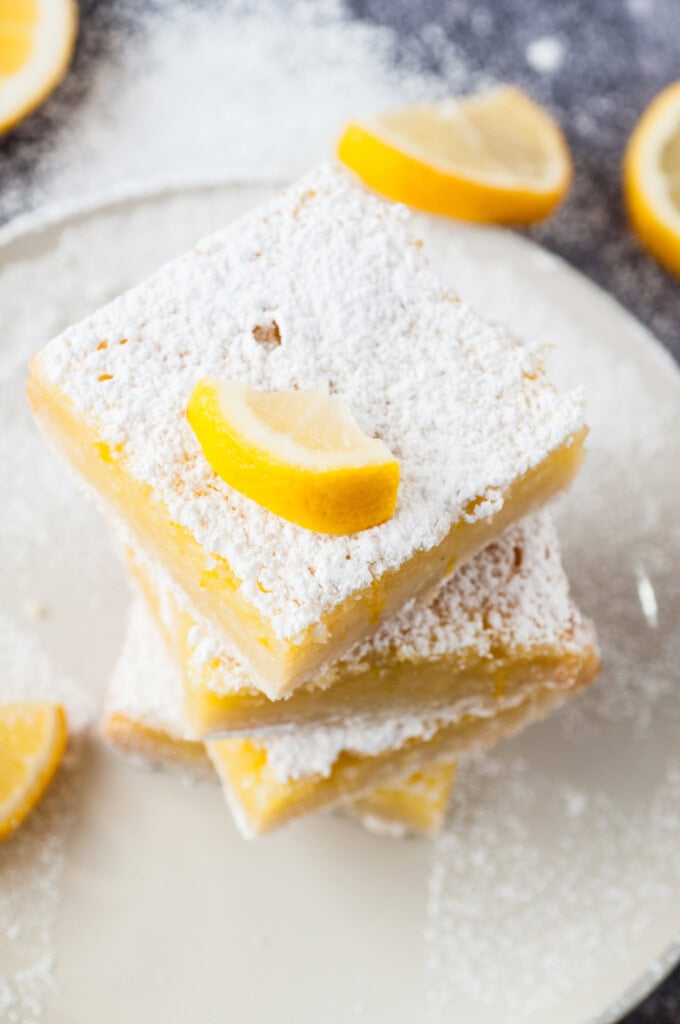
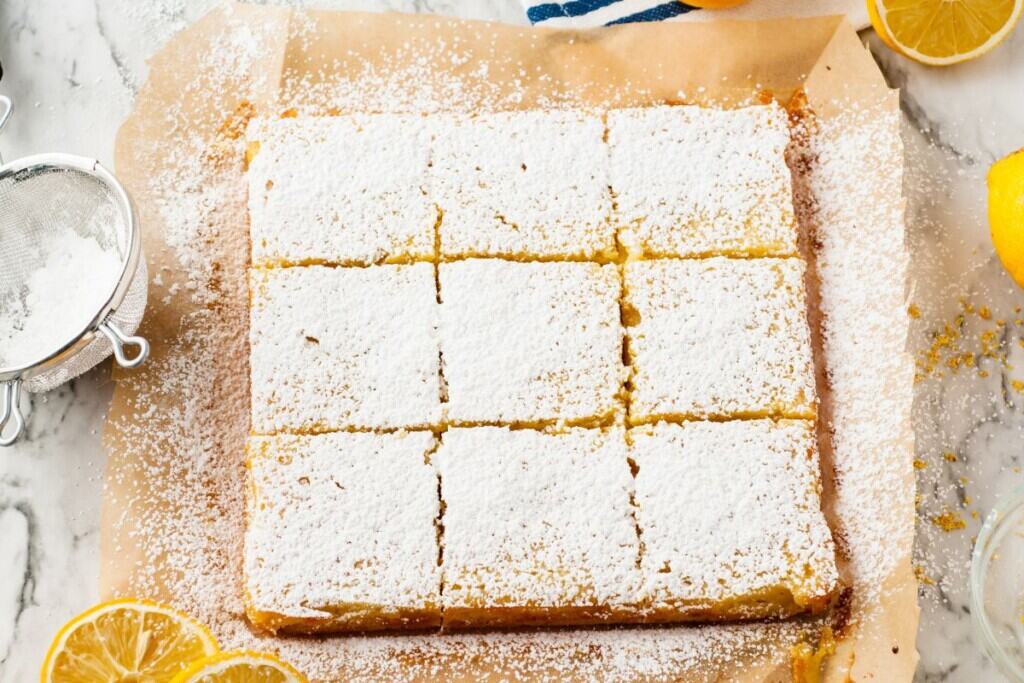
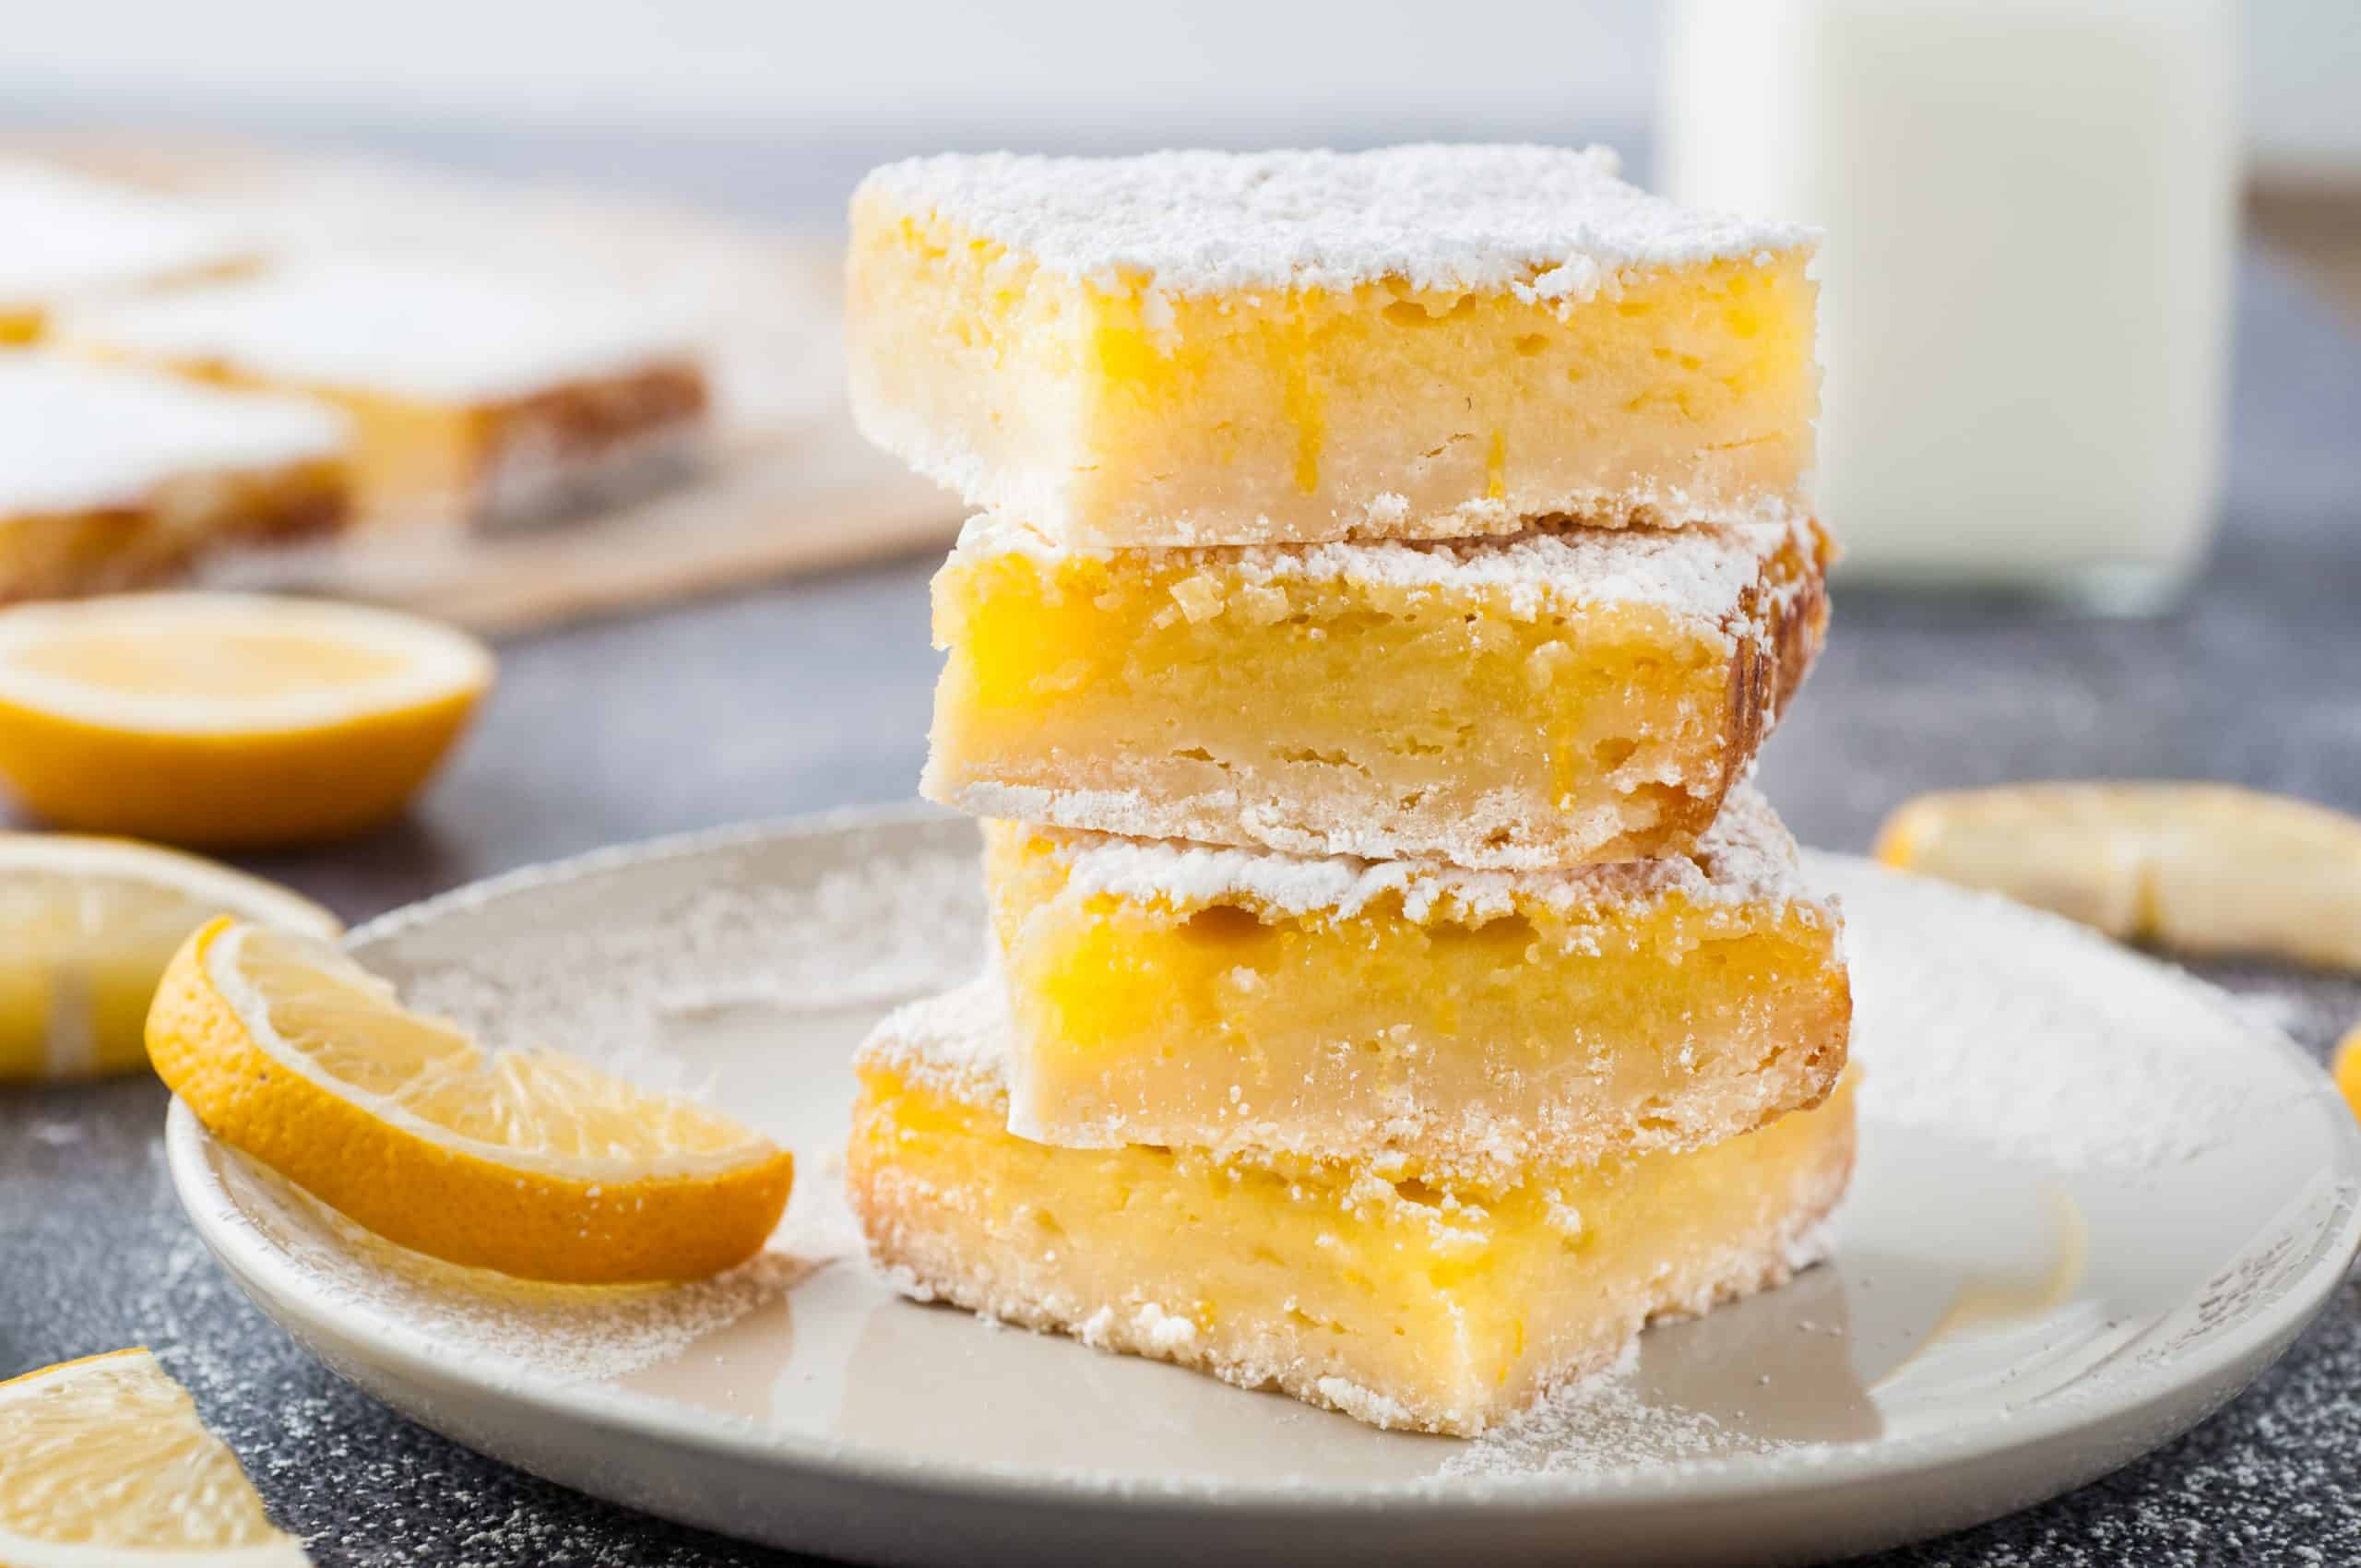
- Use the parchment overhang to lift the bars out of the pan. Cut into 9 large squares or 16 smaller bars using a sharp knife, wiping the blade clean between each cut.
- Dust generously with powdered sugar just before serving.
| 💡 Angela's Tip
For the cleanest slices, run your knife under hot water and dry it before each cut. The warm blade glides through the chilled filling without dragging. |
Angela's Tips for Perfect Lemon Bars Every Time
How to tell when the filling is done. The filling is ready when the edges are fully set and the center no longer jiggles like liquid when you gently shake the pan - it should move as one cohesive piece, or not at all. The top will look slightly matte and set rather than glossy and wet. If the center still ripples like water, add 3-5 more minutes and check again.
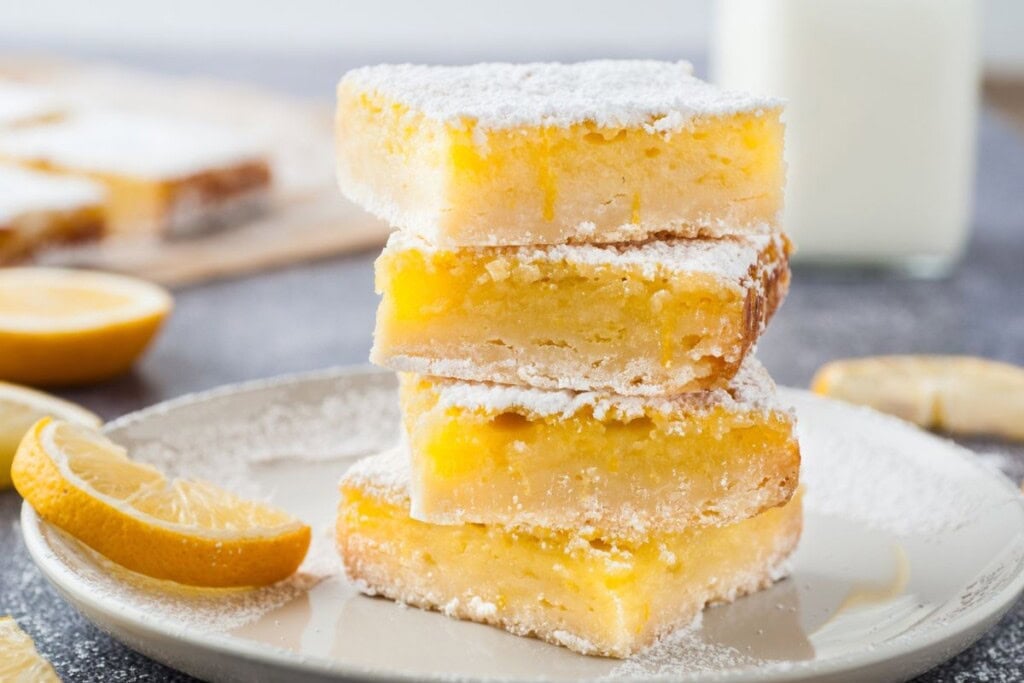
Why there's no baking powder in the filling. Classic lemon bars have a smooth, dense, custard-like filling - the kind that slices cleanly and melts on your tongue. Baking powder causes the filling to puff and become slightly cakey. Leaving it out gives you that silky, true lemon curd texture.
The flour gives you clean slices. The ¼ cup of flour in the filling gives these bars just enough body to hold a neat edge when cut. The extra tablespoon compared to many recipes is the difference between bars that look polished on a plate and bars that smear when you cut them.
Pour the filling over a hot crust - every time. This step is not optional. Pouring the lemon filling directly onto the just-baked, still-hot crust helps the two layers bond. If you let the crust cool first, the layers will slide apart when you cut the bars.
Fresh lemon juice is worth it. Bottled lemon juice works in a pinch, but fresh-squeezed gives you a noticeably brighter, cleaner flavor. You'll need about 2-3 lemons for ½ cup of juice.
Chill before you cut - no shortcuts. Cutting warm bars results in runny, messy edges. Let them cool to room temperature first, then refrigerate for at least 1 hour (overnight is ideal).
Dust powdered sugar right before serving. If you dust ahead of time and refrigerate, the sugar absorbs into the moist filling and disappears completely. Dust just before serving. A fine-mesh sieve gives you the most even, elegant finish.
How to Store Lemon Bars
Refrigerator: Store lemon bars in an airtight container in the refrigerator for up to 5 days. Keep powdered sugar separate and dust just before serving.
Freezer: These bars freeze beautifully. Wrap individually in plastic wrap, then place in a freezer-safe bag or container for up to 2 months. Thaw overnight in the refrigerator and add a fresh dusting of powdered sugar before serving.
Serving Suggestions
Lemon bars are incredibly versatile and fit right into a holiday dessert spread. Here are a few ways I love to serve them:
- Cut into 16 smaller bars for a holiday cookie tray - they hold their shape and travel well
- Serve the lemon bars alongside other citrus desserts for a bright contrast on a dessert table
- Pair with a lemon-themed spread - my Vintage Lemon Fluff Salad and Lemon Blueberry Scones make a beautiful lemon-lover's menu
- Plate individually with a small sprig of fresh mint and an extra dusting of powdered sugar for a more formal presentation

Lemon Bars FAQ
The most common reason is underbaking. The filling needs a full 25 minutes at 325°F after the crust is done. Test for doneness by gently shaking the pan - the center should move as one cohesive piece, not ripple like liquid. If it's still runny, give it 3-5 more minutes and test again. Another cause is cutting the bars before they've been fully chilled. Always refrigerate for at least 1 hour (overnight is better) before slicing.
Yes - and they're actually better made ahead. The filling sets more firmly and slices more cleanly after an overnight chill in the refrigerator. You can make them up to 2 days in advance. Just hold off on the powdered sugar until right before serving, since refrigeration causes it to absorb into the filling.
You can, but fresh-squeezed lemon juice makes a noticeably brighter, cleaner-tasting bar. Bottled juice tends to taste slightly flat by comparison. If fresh lemons aren't available, bottled works in a pinch - just make sure it's 100% lemon juice with no additives. You'll need about ½ cup.
Why do my lemon bars have a white film on top after baking?
That white layer is completely normal for lemon bars- it's a thin protein film that forms on the surface of the eggs as they bake. It doesn't affect the flavor at all. A generous dusting of powdered sugar covers it completely, and most people never notice it.
Yes! Lemon bars freeze well for up to 2 months. Let them cool and chill completely, then wrap each bar individually in plastic wrap and place in a freezer-safe bag or airtight container. Thaw overnight in the refrigerator. Add a fresh dusting of powdered sugar just before serving, since any sugar applied before freezing will absorb and disappear.
Absolutely. For a doubled batch, use a 9×13-inch baking pan. The crust bake time stays about the same (around 20 minutes). The filling bake time may need an extra 5-10 minutes since the pan is larger - use the jiggle test to check doneness rather than relying strictly on the timer.
This post was originally published on March 17, 2020. It was updated on March 31, 2026 with new tips and answers to questions.
Easy Lemon Bars
Equipment
- 8×8-inch square baking pan
Ingredients
Shortbread Crust Dry Ingredients
- 1 cup all-purpose flour
- ¼ teaspoon salt
Shortbread Crust Wet Ingredients:
- ½ cup 1 stick unsalted butter, softened to room temperature
- ¼ cup granulated sugar
Lemon Filling Dry Ingredients:
- 1 cup granulated sugar
- ¼ cup 4 tablespoons all-purpose flour
- ¼ teaspoon salt
- Wet Ingredients:
- 3 large eggs
- ½ cup fresh lemon juice about 2-3 lemons
- 3 teaspoons lemon zest about 1-2 lemons
For Finishing
- ½ cup powdered sugar for dusting
Instructions
Make the Shortbread Crust:
- Preheat: Position oven rack in the center of the oven and preheat to 325°F. Line an 8×8-inch baking pan with parchment paper, leaving overhang on two sides for easy removal.
- Prepare crust: In a medium bowl, combine flour, salt, softened butter, and granulated sugar. Use a fork or your fingertips to mix everything together until the butter is fully incorporated and the mixture forms a soft, cohesive dough. It should hold together when you press a pinch between your fingers.
- Press and bake: Press the dough firmly and evenly into the bottom of the prepared pan, using the flat bottom of a measuring cup to pack it smooth and level. Bake for 20 minutes, until the crust is set and lightly golden around the edges.
Make the Lemon Filling:
- Combine dry ingredients: While the crust bakes, whisk together the granulated sugar, flour, and salt in a large bowl.
- Add wet ingredients: Add the eggs, lemon juice, and lemon zest to the dry ingredients and whisk vigorously until the mixture is completely smooth and well combined, about 1 minute.
Assemble and Finish:
- Pour filling: As soon as the crust comes out of the oven, immediately pour the lemon filling evenly over the hot crust. Do not allow the crust to cool before adding the filling - the heat from the crust helps the filling bond to it and prevents separation.
- Bake: Return the pan to the 325°F oven and bake for an additional 25 minutes, until the filling is just set and no longer jiggles in the center when the pan is gently shaken.
- Cool and chill: Let the bars cool completely in the pan on a wire rack, about 1 hour. Once fully cooled to room temperature, cover loosely with plastic wrap and refrigerate for at least 1 hour before cutting. Chilling is essential for clean, neat slices.
- Cut and finish: Use the parchment overhang to lift the bars out of the pan and transfer to a cutting board. Cut into 9 large squares or 16 smaller bars using a sharp knife. Just before serving, dust generously with powdered sugar.

15 Comments