
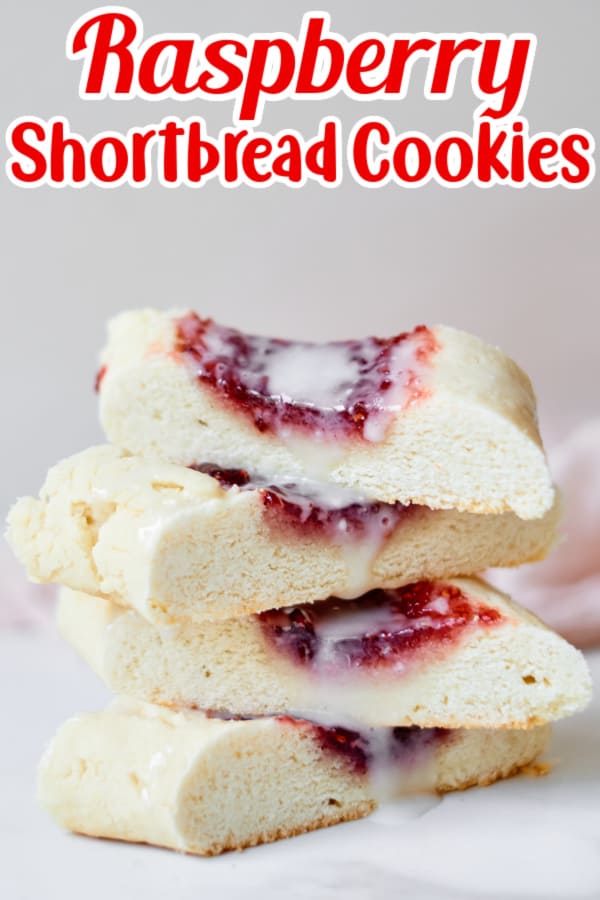
Raspberry Shortbread Cookies

These Raspberry Shortbread Cookies are an elegant yet simple dessert that combines the buttery richness of classic shortbread with vibrant fruit preserves. Perfect for holiday cookie trays or year-round entertaining, these stunning cookies feature a tender, crumbly shortbread base filled with sweet raspberry preserves and finished with a delicate lemon glaze. The best part? They look impressively bakery-worthy but require minimal hands-on time and just a few basic ingredients.
This post contains affiliate links. As an Amazon Affiliate, I earn a commission on qualifying purchases.
What Makes These Raspberry Shortbread Cookies Special
Unlike traditional thumbprint cookies that require rolling individual dough balls, these shortbread cookies use a clever log method that makes preparation quick and consistent. The dough is shaped into long logs, filled with preserves, baked, then sliced into individual cookies-a technique that yields perfectly portioned cookies every time without the tedious work of shaping each one individually.
The shortbread base has that signature tender, crumbly texture that melts in your mouth. The addition of cornstarch is key here-it creates an extra-delicate crumb that sets shortbread apart from regular butter cookies. The raspberry preserves add a burst of fruity sweetness that cuts through the richness of the butter, while the light lemon glaze provides just the right finishing touch without overwhelming the cookie.
Shortbread cookies have a distinct texture that some people love, and I know that they remind me of my childhood. These were the kind of cookies we would make in bulk and package up for sweet treats for friends and family.
Looking for some other great Holiday Recipes? Check these out!
Chocolate Candy Cane Cookies | Peppermint Hot Chocolate Balls | Peppermint Rice Krispie Treats
Ingredient Overview for Shortbread Cookies
For the Cookies:
- Sugar: Granulated white sugar provides sweetness and helps create the tender texture
- Butter: Use real butter (not margarine) for authentic shortbread flavor; make sure it's softened to room temperature for easy mixing
- Vanilla Extract: Pure vanilla extract adds depth and enhances the butter flavor
- Eggs: Bind the dough together and add richness
- Flour: All-purpose flour forms the structure of the cookie
- Cornstarch: This is the secret ingredient that makes shortbread extra tender and crumbly
- Baking Powder: Just a touch for a slightly lighter texture
- Salt: Balances the sweetness and enhances all the flavors
- Raspberry Preserves: Choose a good-quality preserve with visible fruit pieces for the best flavor; you can substitute with strawberry, apricot, or any flavor you prefer
For the Icing:
- Powdered Sugar: Creates a smooth, sweet glaze
- Lemon Juice: Adds brightness and cuts the sweetness; fresh-squeezed is best
- Water: Thins the icing to drizzling consistency
- Vanilla Extract: Rounds out the flavor

How to Make Raspberry Shortbread Cookies
Step 1: Prepare Your Workspace and Preheat
Begin by preheating your oven to 375°F. Line a large baking sheet with parchment paper-this prevents sticking and makes cleanup much easier. Having everything ready before you start mixing ensures a smooth baking process.
Step 2: Cream the Butter and Sugar
In a large mixing bowl, combine the sugar and softened butter. Using an electric mixer on medium speed, beat them together for 2-3 minutes until the mixture is light, fluffy, and well-blended. This creaming process incorporates air into the dough, which contributes to the cookie's texture. The mixture should look pale and slightly increased in volume.
Add the eggs and vanilla extract to the butter-sugar mixture. Beat on medium speed for another 1-2 minutes until everything is thoroughly combined and the mixture looks smooth and creamy. Make sure to scrape down the sides of the bowl with a spatula to ensure even mixing.
Step 3: Mix the Dry Ingredients
In a separate medium bowl, whisk together the flour, cornstarch, baking powder, and salt. Whisking ensures these dry ingredients are evenly distributed, so you won't have pockets of cornstarch or salt in your finished dough. The cornstarch is particularly important-it's what gives shortbread its signature sandy, melt-in-your-mouth texture.
Step 4: Combine Wet and Dry Ingredients
Gradually add the flour mixture to the butter mixture, about one-third at a time. Switch from your electric mixer to a sturdy wooden spoon or silicone spatula for this step-overmixing with an electric mixer can make the cookies tough. Stir gently but thoroughly until no flour streaks remain and the dough comes together. The dough will feel slightly tacky to the touch, which is exactly what you want.
Step 5: Shape the Dough into Logs
Divide the dough in half-you should have two roughly equal portions. Lightly flour your work surface and your hands to prevent sticking. Working with one portion at a time, use your palms to roll the dough back and forth, gradually lengthening it into a log shape.
The goal is to create two logs that are each about 12 inches long and approximately 2 inches wide. Don't worry about making them perfectly uniform-slight variations are completely normal and won't affect the final result. The key is to work gently and avoid compressing the dough too much, which can make the cookies dense.
Step 6: Position and Prepare the Logs
Carefully transfer both logs to your prepared baking sheet, positioning them at least 4 inches apart. They won't spread much during baking, but this spacing allows air to circulate and ensures even browning.
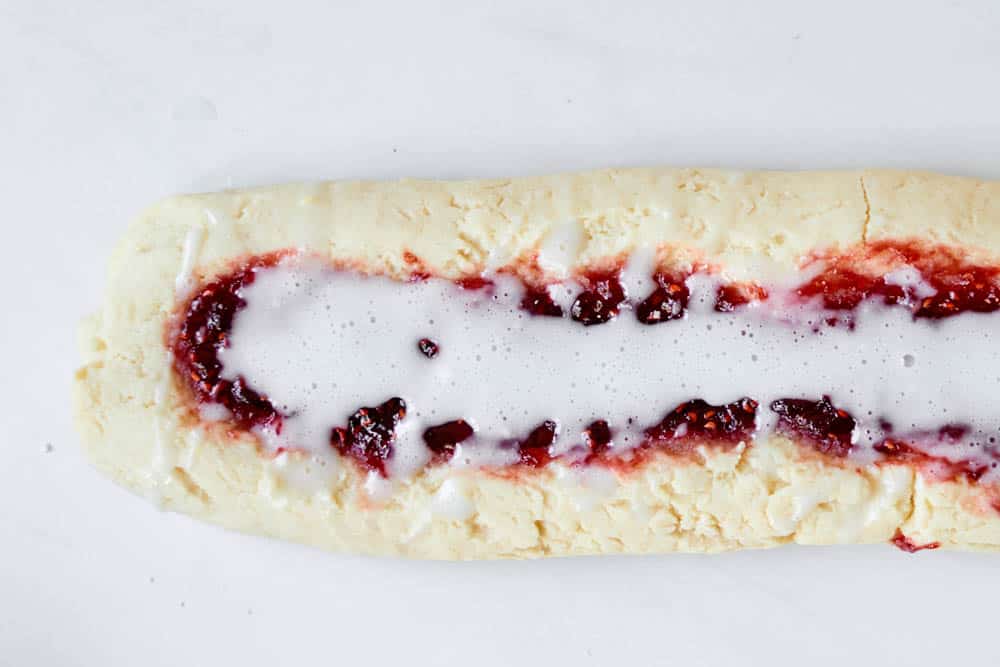
Now comes the fun part: using your index finger (or the handle of a wooden spoon), press down the center of each log lengthwise to create an indentation. The indentation should be about ½ inch deep and run the entire length of the log. This channel will hold your raspberry preserves, so make sure it's deep enough and consistent throughout.
Step 7: Fill with Preserves
Spoon or pipe the raspberry preserves into the indentation you just created. Fill it generously-the preserves will thicken slightly as they bake and won't overflow. If you're using a spoon, a small teaspoon works well for getting the preserves neatly into the channel. For even more control, you can put the preserves in a small zip-top bag, snip off a corner, and pipe them in.
Step 8: Bake to Golden Perfection
Place the baking sheet in your preheated 375°F oven on the center rack. Bake for 20 minutes, watching during the last few minutes. The cookies are done when the edges are lightly golden brown and the tops look set. The preserves should be bubbling slightly.
Don't overbake-shortbread can go from perfectly done to too dry quickly. If the edges are golden and the cookie feels firm (not squishy) when gently pressed, it's ready.
Step 9: Make the Lemon Glaze
While the cookies are baking, prepare your icing. In a small bowl, combine the powdered sugar, lemon juice, water, and vanilla extract. Whisk vigorously until the mixture is completely smooth with no lumps. The icing should be thin enough to drizzle but thick enough to create visible white streaks on the cookies. If it's too thick, add water a few drops at a time; if it's too thin, add more powdered sugar.
Would you like to save this?
Step 10: Glaze and Slice
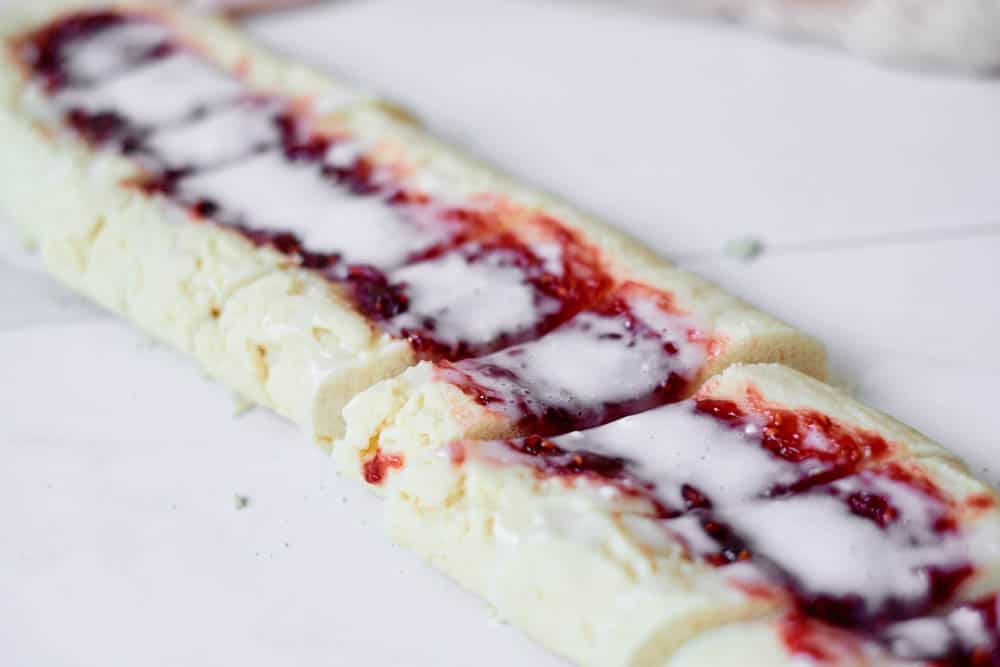
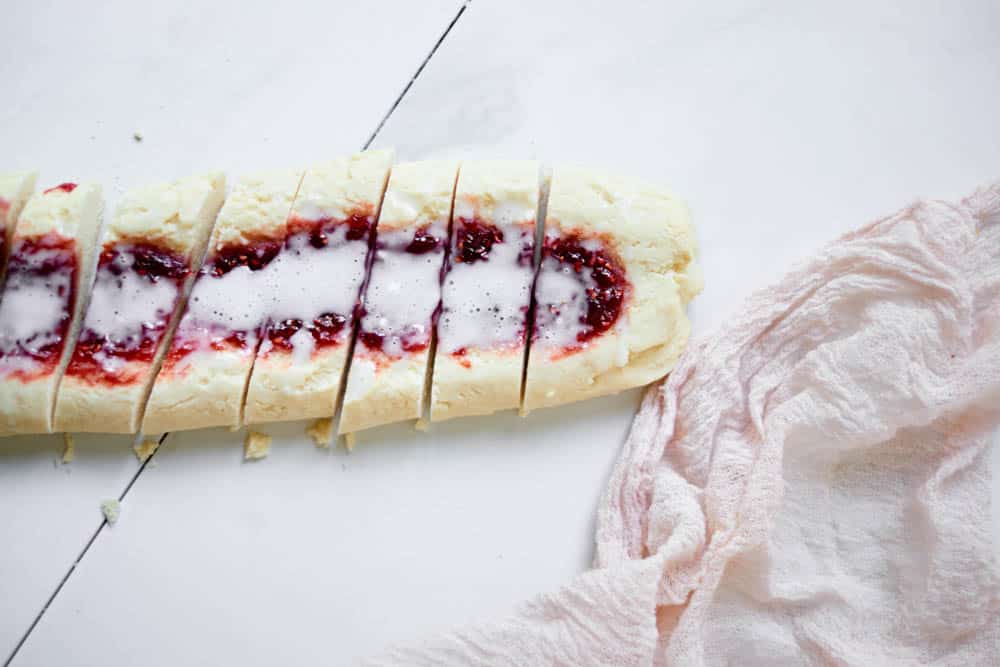
Remove the baking sheet from the oven and let the logs cool on the pan for about 2-3 minutes-just enough time for them to firm up slightly. Using a wide spatula, carefully transfer each log to a cutting board.
While the logs are still warm, use a spoon to drizzle the lemon icing back and forth over them in a decorative pattern. The warmth of the cookies will help the icing set with a lovely glossy finish.
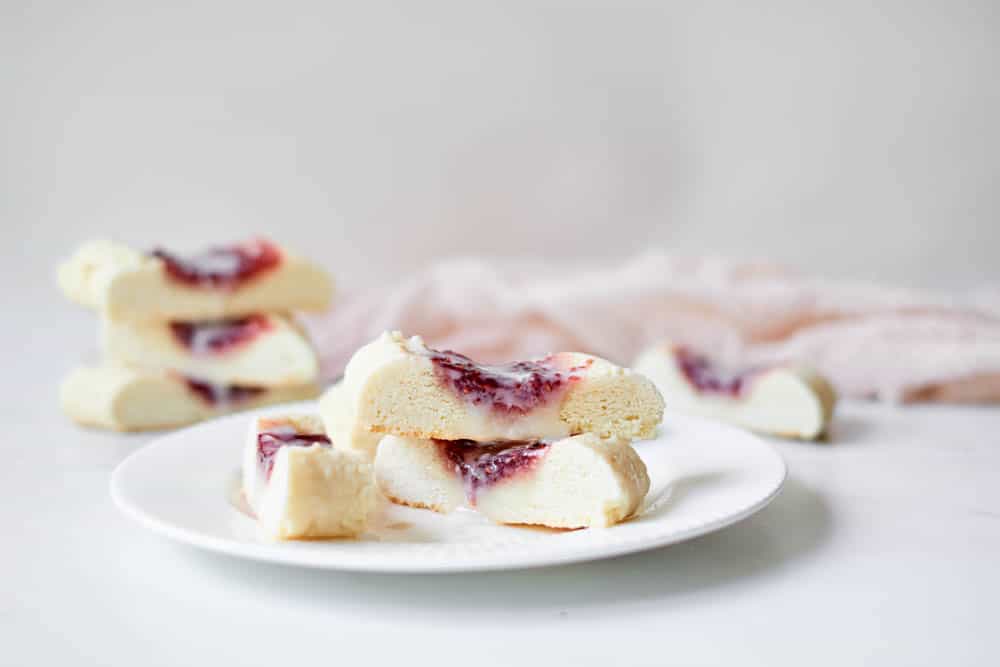
Using a sharp knife, cut each log diagonally into 1-inch pieces. Cutting at an angle gives you those beautiful elongated diamond-shaped cookies. Make clean, decisive cuts rather than sawing back and forth, which can tear the preserves.
Let the cookies cool completely on the cutting board before fully separating them-this allows the icing to set and prevents the cookies from breaking apart.
Tips for Success
Room Temperature Butter: This is crucial. Butter that's too cold won't cream properly, and butter that's too soft or melted will make the dough too loose. The butter should be soft enough to leave an indent when pressed but still hold its shape.
Don't Overmix: Once you add the flour mixture, mix just until combined. Overworking the dough develops too much gluten, resulting in tough, cake-like cookies instead of tender, crumbly shortbread.
Consistent Log Size: Try to make your logs similar in thickness so they bake evenly. If one log is significantly thicker than the other, it may need extra baking time.
Preserve Selection: While raspberry is classic, feel free to experiment with different preserves. Apricot, strawberry, blackberry, and even lemon curd all work beautifully. Just make sure you're using preserves (which contain fruit pieces) rather than jelly for the best texture and flavor.
Storage and Make-Ahead Tips
Store cooled cookies in an airtight container at room temperature for up to 5 days. Place parchment paper between layers to prevent the icing from sticking.
For longer storage, these cookies freeze beautifully. Layer them in a freezer-safe container with parchment paper between layers and freeze for up to 3 months. Thaw at room temperature for about 30 minutes before serving.
Make-Ahead Option: You can prepare the dough logs up to 2 days in advance. Shape them, wrap tightly in plastic wrap, and refrigerate. When ready to bake, let them sit at room temperature for about 10 minutes, then proceed with making the indentation, filling, and baking. Cold dough may need an extra minute or two in the oven.
Troubleshooting Common Issues
My dough is too sticky to roll: If your dough feels excessively sticky, refrigerate it for 15-20 minutes to firm up the butter. You can also add an extra tablespoon or two of flour, but be careful not to add too much or the cookies will be dry. Remember, the dough should be slightly tacky-that's normal for this recipe.
The logs are cracking as I roll them: This usually means the dough is too cold or you're applying too much pressure. Let the dough sit at room temperature for a few minutes to soften slightly, and use gentle, even pressure as you roll. If cracks do form, simply press them back together with your fingers.
The preserves are overflowing during baking: Make sure your indentation is deep enough (a full ½ inch) and wide enough to contain the preserves. Also, avoid overfilling-you want a generous amount but not so much that it spills over the edges of the channel.
My cookies are too hard or dry: This is usually from overbaking. Shortbread should be tender and slightly crumbly, not hard. Watch your baking time carefully and remove the cookies when the edges are just lightly golden. Remember, they'll continue to firm up as they cool.
Icing is too runny: Add more powdered sugar, a tablespoon at a time, until you reach the desired consistency. The icing should leave visible white streaks when drizzled but still flow easily from a spoon.
The icing is too thick and won't drizzle: Add water or lemon juice, just a few drops at a time, and whisk thoroughly. A little liquid goes a long way, so add it gradually.
The cookies are breaking when I cut them: Make sure you're cutting while the logs are still slightly warm-they're more pliable at this stage. Use a sharp knife and wipe it clean between cuts. If the preserves are making cuts messy, try dipping your knife in hot water and wiping it dry between slices.
Frequently Asked Questions
Can I use salted butter instead of unsalted? While you can use salted butter, you'll want to reduce or omit the added salt in the recipe. Unsalted butter gives you more control over the final flavor and is generally recommended for baking.
Can I make these without cornstarch? In a pinch, you can substitute the cornstarch with an equal amount of flour, but the texture won't be quite as tender and delicate. Cornstarch is what gives shortbread its signature melt-in-your-mouth quality, so it's worth keeping on hand for this recipe.
How do I know when the cookies are done? Look for lightly golden edges and a set appearance on top. The cookies should feel firm when gently pressed (not squishy or doughy). The preserves will be bubbling slightly. If you're unsure, it's better to err on the side of slightly underbaked rather than overbaked-shortbread can become dry if baked too long.
Can I double this recipe? Absolutely! This recipe doubles beautifully. You'll need two baking sheets or you'll need to bake in batches. Just make sure each log has adequate space on the baking sheet for even heat circulation.
Why are my cookies spreading too much? Shortbread typically doesn't spread much, but if yours are spreading excessively, your butter may have been too soft when you started, or the dough may have gotten too warm. Make sure your butter is just softened (not melted or greasy), and if your kitchen is very warm, refrigerate the shaped logs for 15 minutes before baking.
Can I use jam instead of preserves? While you can use jam, preserves work better because they have larger fruit pieces and a thicker consistency that holds up better during baking. Jelly tends to be too runny and can bubble over or soak into the cookie.
Do these cookies need to be refrigerated? No, these cookies can be stored at room temperature in an airtight container. The preserves are high in sugar, which acts as a natural preservative. However, if you live in a very hot, humid climate, refrigeration can help them stay fresher longer.
Final Thoughts
These Raspberry Shortbread Cookies strike the perfect balance between impressive presentation and simple preparation. They look like something from a fancy bakery but require no special equipment or advanced techniques-just a mixing bowl, a baking sheet, and some basic ingredients you probably already have in your pantry.
The beauty of this recipe is its versatility. Make them exactly as written for a classic raspberry version, or experiment with different preserves and glazes to create your own signature variation. Serve them at your next holiday gathering, pack them up as homemade gifts, or simply enjoy them with your afternoon tea. However you choose to make and serve them, these cookies are sure to become a cherished recipe in your collection.
Raspberry Shortbread Cookies
Ingredients
- ⅔ Cup Sugar
- 8 tablespoon Butter softened
- 2 teaspoon Vanilla Extract
- 2 Eggs
- 1 ¾ Cups Flour
- 3 tablespoon Cornstarch
- ½ teaspoon Baking Powder
- ½ teaspoon Salt
- ¾ Cup Raspberry Preserves
For Icing:
- ¾ Cup Powdered Sugar
- 2 teaspoon Lemon Juice
- 2 teaspoon Water
- ½ teaspoon Vanilla Extract
Instructions
For cookies:
- Preheat oven to 375 degrees F
- In a large bowl, beat the sugar and butter together with an electric mixer until well-blended.
- Next, add the eggs and vanilla, beat until well-blended
- In a separate small bowl, combine flour, cornstarch, baking powder & salt and whisk together until combined
- Slowly add flour mixture to butter/sugar mixture, stirring with a wooden spoon until well blended (the dough will be tacky).
- Divide dough in half
- On a floured surface, roll dough into two 12 inch long logs
- Place the logs 4 inches apart on a baking sheet that is lined with parchment paper
- Make ½ inch deep indentation with finger on the entire length of the dough log
- Fill the indentation with the raspberry preserves
- Bake at 375 degrees Fahrenheit for approximately 20 minutes or until lightly browned
- Remove logs to cutting board
For Icing:
- Combine powdered sugar, lemon juice, water, & vanilla extract
- Stir with a whisk until well blended
- Drizzle frosting over warm logs
- Cut logs diagonally and allow to cool


10 Comments